Manicure Monday: Springtime in December

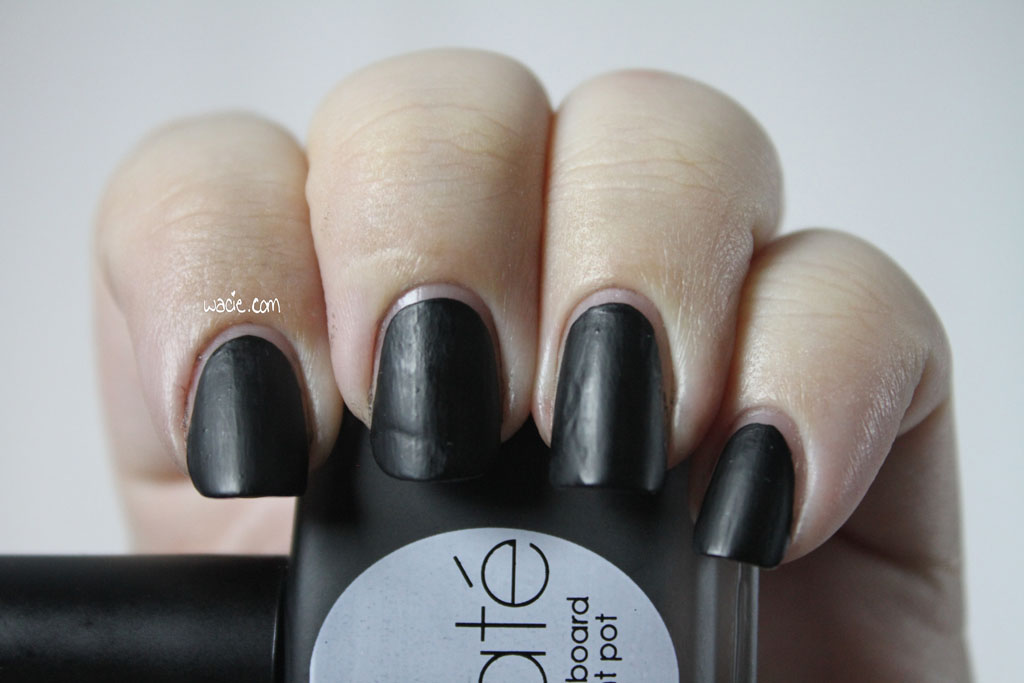
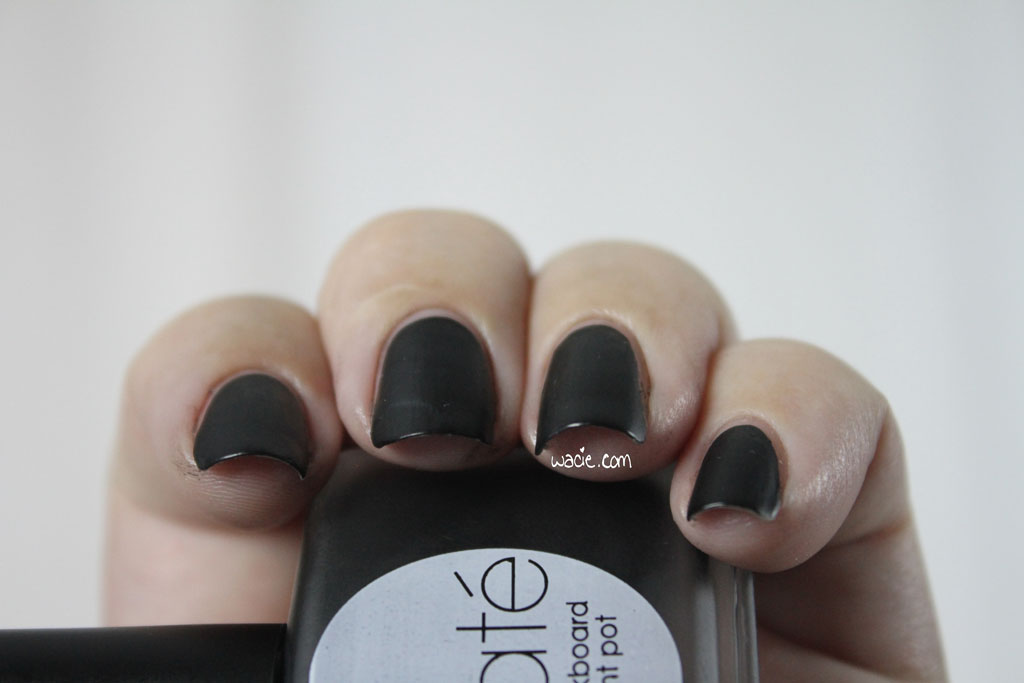
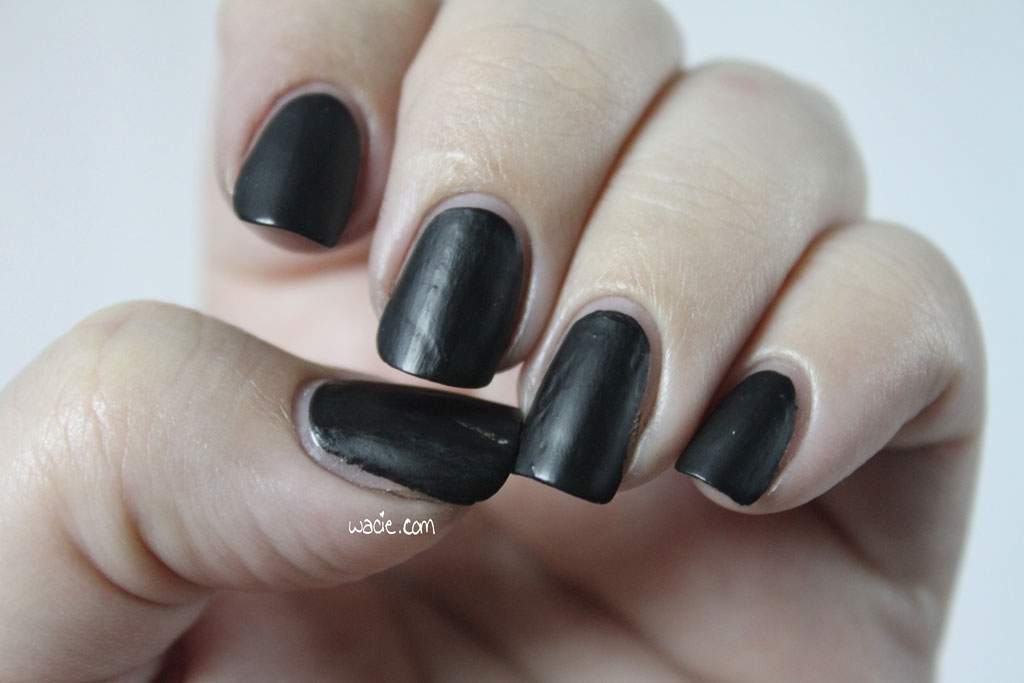
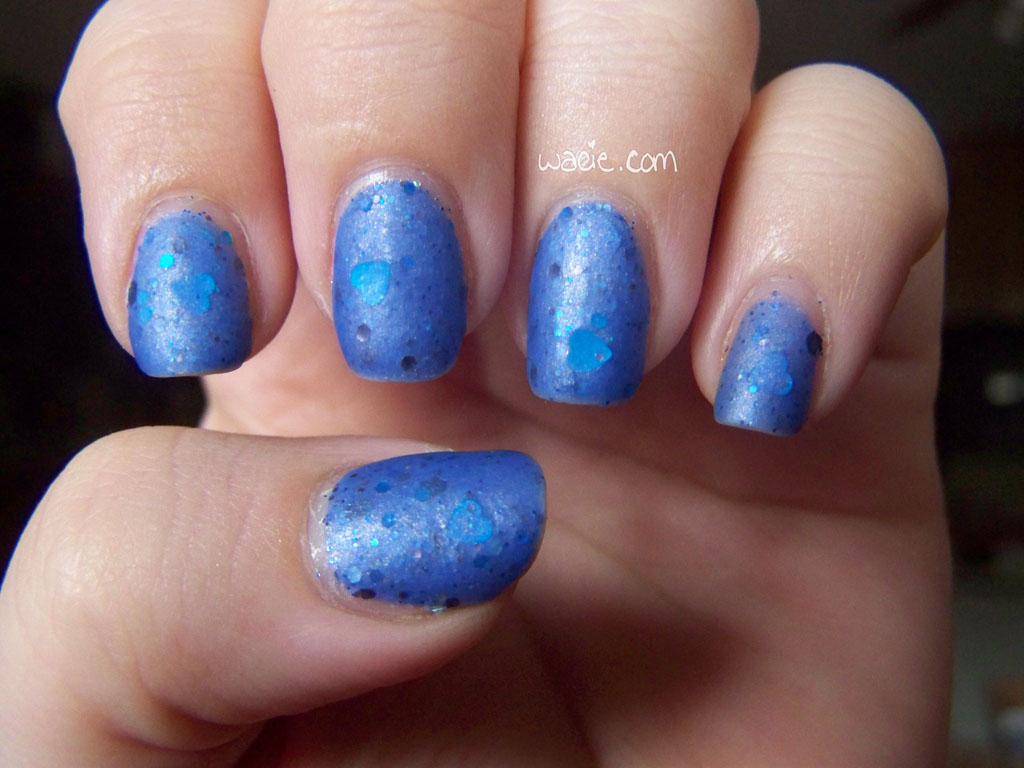
On this Manicure Monday, my manicure is all the things a December mani should not be. Not that I care. Pastels in December are totally cool. It’s warm somewhere. For this spring-forward mani, I’m wearing three coats of Sally Hansen’s No Hard Feelings, two coats of Formula X for Sephora’s Demolition, one coat of Ciate’s Speed Coat Pro top coat, and one coat of Hard Candy’s Mattely in Love matte top coat.

IMG_23022

IMG_23112

No Hard Feelings is a lavender creme polish. It sounds boring, but it’s actually pretty nice. The formula is very nice; it dries in about five minutes, reaches opacity in two coats, and dries with a glossy finish. It’s a lovely color, and I felt a little bad dulling it with the matte top coat.

IMG_23202

Demolition is the first Formula X for Sephora polish on the blog. It was also the first Formula X I ever bought; it caught my eye immediately because I thought it was an indie polish. No foolin! I don’t see many mass market glitter toppers like this, especially with hexes this big. Demolition has large hexes in pink and blue, and smaller ones in pink, green, and blue, and even finer ones in the same colors. It’s such a cool look. Of course, with glitter this large, there’s a bit of texture, even after adding top coat, especially since the bigger glitters stuck together and piled up on itself. It still looks awesome.

IMG_23282

IMG_23362

So in all, not bad. I am still not a fan of matte polish, but I think with the satin glitters, it’s okay. At least it’s colorful.

Summer of Untrieds Day 27: Matte

We’re nearing the end of the Summer of Untrieds! Today’s theme is matte, so I went with Ciate’s Chalkboard Paint from the Chalkboard Manicure set. I’m wearing three coats of it with no top coat.

IMG_74322

IMG_74372

Chalkboard Paint is a matte black creme. I had some issues applying it; in some places, it cracked, showing my bare nail underneath, like a crackle polish. Check out my thumb nail, that’s where it’s the most apparent. It’s also unforgiving; I tried to cover the cracks, but they just show through the second coat. However, it does dry very matte. It has no shine whatsoever, so it has that going for it, which is nice.

IMG_74472

IMG_74562

IMG_74622

IMG_74692

The Chalkboard Manicure set also come with four chalk pens for nail art, so I got them out and doodled out a rough vintage roses design. Really rough.

IMG_74792

Manicure Monday: Double Reverse Green on Green Gradient

So for this Manicure Monday, I did some actual nail art instead of phoning it in with glitter. I always feel a little weird when I do a glitterless mani, like my nails are still naked somehow. This week, I did a double reverse gradient with Julep’s Payton and Color Club’s Twiggie. Payton is shown on the non-accent nails with two coats. All nails have a coat of Seche Vite top coat and Hard Candy’s Matte-ly in Love. Photos were taken indoors and outdoors.

IMG_53202

IMG_53312

IMG_53242

So the colors I chose this week go well together, but were still somewhat incongruous. Payton is a gorgeous kelly green creme that went on sheer with the first coat; the second coat even it out, but it was still deliciously shiny, a finish I’d expect from a jelly. Twiggie was a much more solid creme, and was opaque on its first coat. Together, Twiggie is the foundation of the gradient, and I didn’t get the opacity I expected from Payton, and the resulting gradient left me a little underwhelmed. Payton was so sheer that it didn’t cover over Twiggie as well as I thought it would. I will say this, though: I hated putting the matte coat over Payton. It was so shiny and so beautiful on its own that I felt like I was sucking the life of it by mattifying it. I really felt like I did this polish a disservice.

IMG_53402

IMG_53442

If you’re wondering how to do the double reverse gradient, it’s way simpler than it looks. Here’s the tutorial:

1. After you lay down your base colors, do a gradient the same way you usually do. For what it’s worth, I like to use eyeshadow sponge applicators instead of makeup wedges; for me, it’s more precise and makes less of a mess.

2. After your first gradient is dry, put down your striping tape as desired.

3. Do your second gradient, reversing the colors from the first gradient.

4. Peel off the tape, apply your top coat, and you’re done!

IMG_53522

Outdoors, full sun

IMG_53552

This really looked better in my head. I expected a stronger difference between the colors, but the sheerness of Payton didn’t make that possible. I also feel like I’m missing something; maybe I should have done a coat of Fairy Dust or something under Payton, just to add a little extra sparkle. On the plus side, and this was completely unintentional, it reminds me of a soccer field. I have been so caught up in watching the World Cup matches that I’ve been unable to think of much else. Despite the issues I’ve had with the polish compatibility, I love how this turned out.

PS: I have Payton on my toes as well. I love it. It’s like every toe is cosplaying as the toe from The Big Lebowski.

Swatch Saturday: Blue Eyed Girl Lacquer’s It’s Smaller on the Outside

My swatch this week is of It’s Smaller on the Outside, and it’s one of the first Blue Eyed Girl Lacquers I ever bought. I’ve had it for a really long time, and this is the first time I’ve ever worn it. You may notice a trend here. It’s Smaller on the Outside is shown here at three coats, topped with three coats of Seche Vite.

100_33882

100_33952

100_34002

It’s Smaller on the Outside is a shimmery cornflower blue loaded with various blue glitters, including blue hearts. The formula is a bit thick, almost creamy, which I’m going to attribute to all the shimmer. It’s really sparkly. It’s opaque in two coats, though I added a third for personal tastes. The glitter spreads easily, and it doesn’t take too much effort to get the hearts out. One thing, though: the polish is so thick and opaque is covers any hearts on the middle coats. I had one or two on each nail per coat, and they just got covered up. Whatever. It’s still cute.

100_34222

100_34272

100_34342

100_34362

For funsies, I put a matte coat over it, just because it’s so shiny you can’t really see the glitter and creamy texture in the photos. The matte coat killed it. It looks like a chambray shirt. It totally worked though, you can see all the glitters. There are so many!

100_34442

100_34472

One last note: I know this is a Doctor Who-inspired polish. Doctor Who is a thing that’s completely beyond my area of expertise. I know lots of indie-scene polishes are inspired by something, and because Doctor Who has such a wide fanbase, it’s inevitable that the two blend together. This isn’t the only DW-inspired polish I have, and they’re all gorgeous. I don’t care about the inspiration as much as I do about the polish, but I do admit it’s a little weird having so many and not really knowing where it came from.

Manicure Monday: Whirled Away Over Yellow

This week, I’m finally arriving to the black and white glitter topper party. Also, I forgot how much I love yellow polish. This is also my first Color Club mani, so that’s exciting too, I guess.

100_33692

Color Club’s Almost Famous is part of their Poptastic collection, which according to the packaging, are all colors that POP. This one certainly does pop. I really love this one. It went on smoothly and easily and turned opaque in two coats. I’m pretty impressed by the quality. I’ll go ahead and mention I got the whole Poptastic set and the Take Wing set for $8 each at Bealls Outlet. Yeah, it was awesome.

When I saw China Glaze’s Whirled Away, I knew I had to have it. At that point, I’d turned to nail polish to ward off the loneliness of having my boyfriend living in another state, and a certain enabler showed me this one. It was so unlike anything else I’d seen or owned; I fell hard for it and spent my dinner money on it. I regret nothing.

Color Club's Almost Famous and China Glaze's Whirled Away. Also that's Hard Candy's matte top coat on the end.

Color Club’s Almost Famous and China Glaze’s Whirled Away. Also that’s Hard Candy’s matte top coat on the end.

This is a look I like. I had a little application problem with Whirled Away; it picked up some of the yellow, and while it didn’t smudge the color, some of the black glitter has a weird greenish wash over it. This is probably most evident on my thumb. Apart from that, I like the chaos of the glitter over the bright color. Also, the matte coat was an afterthought; I figured that since the glitter was matte, it couldn’t hurt. I’m always afraid I’m going to ruin the mani with a matte finish. I’ve also switched from the Revlon matte to Hard Candy’s matte, and it’s the first Hard Candy product I’ve ever used. Lots of weird firsts this week.

Manicure Monday: Matte Pink Glitter

New year, new glitter! Here’s my first manicure of 2014. I’ve decided to try out a matte coat over glitter, and I’m not sure how much I like the result, but here it is.

100_2957

A Cut Above is a fantastic glitter topper made up of various sizes of pink glitter. It applies evenly with the brush, which means I didn’t have to flood my cuticles and waste a lot of polish to get this look. It went on very easily. When I put the matte top coat on, I felt like I was taking something away from it, but maybe I got something in return. The glitter still shines, but has a softer quality. It’s pretty and it’s interesting, but I’m not sure if I’ll do it again. I want my glitter to shine.

100_2963

Also, I seem to have this problem with matte topcoats; the tips wear down more easily. Do you see those exposed tips? I just did these, and somewhere between applying the topcoat and taking the photos, the tips are worn down. That’s embarrassing. I feel dirty posting them, they’re so bad. Maybe it’s just this topcoat, but every time I use it, I have the same problem. I hate it.

Sally Hansen's Black Out, Essie's A Cut Above

Sally Hansen’s Black Out, Essie’s A Cut Above

I’ll mention this on the side: About a year ago, when I was living alone, I needed acetone. The store nearest me, which was about a half mile away, was perpetually out of acetone, so I sucked it up and went the extra mile (literally) to Walgreens. Meanwhile, I had some Christmas money burning a hole in my pocket, and I didn’t yet own any Essie polishes, so I knew I’d leave with a few of those, too. It took me ages to find the acetone; it ended up being on some hidden aisle endcap outside of the cosmetics department. As I walked around looking for it, I’d found tons of other things to buy, and I spent literally every cent I had on my wallet. I felt a little guilty (and a little relieved I didn’t have to put things back), but I did what I went to do. I bought acetone (at least I didn’t forget that) and I got my first Essies. Also, I walked three miles just to buy them, which says quite a lot about my dedication and/or insanity.

The haul from that fateful day.

The haul from that fateful day.

Manicure Monday: Neon Orange Dotticure

Nothing says December like neon orange!

100_2689

Those bows are freaking cute.

I had a lot of fun doing these. It was a lot of work; first I needed three coats of white polish to make a underwear layer without any bald spots (I still had some), then I needed three coats of the orange to make that color solid. Adding the dots was tough; left hand looks awesome, right hand not so much, my toes are even worse (no, you don’t get to see them). I then put on three coats of Seche Vite for rigidity, a matte coat for a finish, then applied the bows with a healthy dot of super glue. Yeah. I didn’t finish these nails until like eight o’clock last night. I started them at noon. Overall, I like the look I got. And I thought a dotticure would be boring.

Sally Hansen's Hard to Get, LA Colors's Spat!, Julep's Bess

Sally Hansen’s Hard to Get, LA Colors’s Spat!, Julep’s Bess

The orange is LA Colors’s Spat!, which is an awesome orange so long as you have the appropriate white coat beneath. The formula is so watery and thin that it would be pretty tough to get the neon effect without it. The blue is Julep’s Bess, which dotted better than I thought it would. I thought it was going to be watery and thin, too, but this one held up quite well. I got the bows from Claire’s, and they made it through the night and this morning’s shower. I wonder how long they’ll hang on before they get snagged on something and come off.

Manicure Monday: Matte Gold Sparkles

Here is another great manicure ruined by cheap top coat.

100_2348

It started so well. I used two coats of this very dark, very opaque OPI shade called We’ll Always Have Paris. It looked purplish in the fluorescent supermarket lights, and when I got home with it, it was like a deep brown. It still looks purple in direct sunlight, but it’s brown enough that it worked for my purpose this week. I’m still not entirely sure what color it even is, and I’ll admit it I just bought it for it’s name, because I’m kind of obsessed with France. I love these dark, vampy colors, though. They remind me of middle school, when I wasn’t allowed to wear black nail polish (or black lipstick, or dye my hair black), but I could get away with just about any other dark color. As a result, I wore lots of of dark purples and silvers and browns to get the same effect. I still love how it makes my nails look.

100_2349

The notch on the ring finger is from picking at dried polish around the cuticle. Entirely my fault.

The gold sparkles are As Gold as It Gets by Essie. This is one of the first Essies I ever bought myself, way back around Christmas when I’d gotten some money, and I had to walk the whole mile to Walgreens to get a bottle of acetone because the nearer store was out. While I was there, I checked out the nail polish. I’d come all that way, right? I didn’t yet own any Essie polishes, I had money rolling around in my pocket, I splurged and bought as many as I could carry. I spent literally every cent I had on Essie polishes and acetone. Anyway, I love the Essie LuxEffects line, and I like this one in particular. It gives any color an iridescent warmth and a unique finish, one that’s different from gold leaf or glitter. Adding the matte top coat to it guarantees you can see every piece of gold.

OPI's We'll Always Have Paris, Essie's As Gold as It Gets, Revlon's matte top coat

OPI’s We’ll Always Have Paris, Essie’s As Gold as It Gets, Revlon’s matte top coat

Somehow, I don’t know how this happened, the top coat completely smudged my tips. Somehow, it ate through three layers of polish, even though I’d given it ample time to dry so as to avoid this. I am so mad at myself for using up all my Seche Vite. I think I’m going to just buy one of those mega large bottles and be done with it.

Manicure Monday: Gold and Nude Half-Moons

So I’m back from my work trip, and it’s time for another manicure.

100_2203

My long, beautiful nails made it through the conference, but broke one after the other when I got home. My index fingernail tore off while I was washing my hair Saturday morning. I broke a thumbnail turning the crank to shut a window. I broke the other thumbnail cleaning for a surprise houseguest. I gave up and preventively cut all the rest. I miss them. I miss how they made my fingers look long and slender. However, my hands are much more functional now.

Julep's Kennedy, LA Colors' Cactus, Revlon's matte top coat

Julep’s Kennedy, LA Colors’ Cactus, Revlon’s matte top coat

I’m not sure if I wrote about this yet, and I’m kind of ashamed to admit it, but I’ve bought almost a hundred bottles of polish in the last month or two. The nude (maybe it’s a khaki) was one of the newest ones; I was totally out of control and bought the whole Julep set because I couldn’t choose just one Maven box. It reminds me of unblended foundation. The burnished gold came from my initial dollar store haul when I was first living on my own.

For whatever reason, I have some major tip wear, and I only did them yesterday. I blame the matte top coat.

Manicure Monday: Matte Blue-Black with Glossy Tips

Remember when I wrote about things other than my nails? Yeah, me neither. All the time I spent waiting for this domain, I had many ideas for what I’d do with it when I finally got it, and when I did finally get it, I decided to use it as an outlet for my fiction, but I find myself writing less these days, and not because I want to. I do my nails every week without fail, so that’s why all the entries have been about Manicure Monday. I hope to get back to fictioneering soon.

100_2023

This is a manicure I’ve wanted to try for quite some time. It reminds me of a Sephora bag, with the alternating matte and glossy stripes. It’s one of the simpler manicures I’ve done recently; there’s no glitter, there’s only one color, and you wouldn’t notice the glossy tips unless you were very close. I like the color, and I like that it’s understated, but I wish it was just a little more noticeable. I love it, but I’m not in love with it.

Trying to show you the shiny.

Trying to show you the shiny.

When I bought the matte top coat, I thought I was going to use it all the time, so I bought another one so I’d never run out. This is only the third time I’ve used it. I expected that I would like it more, but I feel like a glossy finish gives the color more life, more sparkle, and putting the matte coat over it just sucks the life out of it. This shade, See You Soon, has this beautiful blue shimmer, and I felt like I was killing it when I mattified it. I hoped it would come back with the Seche Vite on the tips, and it did a little. It’s nowhere near as sparkly as it was.

From left to right: Orly Bonder, Sinful Colors See You Soon, Seche Vite, Revlon Matte top coat

From left to right: Orly Bonder, Sinful Colors See You Soon, Seche Vite, Revlon Matte top coat

Meanwhile, for the rest of the week, I’ll try to find something to write about that isn’t about my nails.