Manicure Monday: Golden Surprise

Welcome back, reader! It’s Monday, and I have some nail art for you. At least, if you can see it. I’ve had a string of these tone-on-tone manis that were all fails; the most recent before today was this silver-on-silver look I wore over the weekend, a look that worked in my head but looked completely different on my nails. This is Enchanted Polish‘s Good Life with Literary Lacquers‘s I Heard the Bells.

Good Life is an excellent polish. It’s such a strong gold polish, it’s got a strong holo, and it has this gold-to-green shift that completely changes the tone of the polish. It’s this cool-toned shift that makes the nail art visible. I did a few criss-crosses with striping tape, hoping the difference between glitter and holo would create some distinctive lines. There’s not enough contrast without the shift.

The art got a little messed up on the ring finger. I’m a little grateful you can’t see it.

In the shade.

I Heard the Bells is a pretty wonderful polish too. It’s full of fine glitters, but doesn’t dry with a texture, and it’s actually pretty easy to take off. I always get this polish out around the holidays — it is a holiday exclusive, after all — and incorporate it into a Christmas mani, but since I had it sitting out, I couldn’t resist using it. It’s a shame you can’t really see it here.

Enchanted Polishes are sold in their online shop. Literary Lacquers are sold on etsy.

I bought these polishes myself.

A Look Back at 2016

Hello reader! Now that 2016 is behind us, I wanted to look back on some of my blog highlights and share my favorite nail art looks, and maybe share some of my 2017 blogging goals with you. I guess I could have waited to do this on my blog-versary in March, but it feels more appropriate to do it now.

January: Elevated Gradient

February: Neon Satisfaction

You’ll notice these photos are tiny. Why? Because in March, The Great wacie.com Server Crash of 2016 happened! My webhost had a hardware failure, and for whatever reason, several months of posts were lost and had to be pieced back together with images and text cached by Google. It was an extremely frustrating and embarrassing time for me.

March: Spring Hibiscus

I miss these long nails.

This is probably my favorite look of the year.

Third Anniversary Do-Over

I mentioned earlier that my blog’s anniversary is in March. For last year’s anniversary, I recreated the first-ever mani I posted on my blog. I don’t know yet what I’ll do for my fourth year, but it’ll probably be awesome.

April: Dusty Watermarble

May: Neon Splatter

I went to Hawaii in May. As a result, this is my least active month on the blog for the year.

June: Orange Jello Sandwich

My first Empties Roundup post was also in June.

July: Beyond

August: Ombre Hearts

September: Popples

October: Stripey Blue Frosting

This was a look I did to celebrate my birthday.

November: Ruby Opal

December: White Snow Blue Lava

So there’s my year! This was probably the busiest year for the blog, since I broadened my sujects quite a lot. I did tons of swatches and nail art, but I also ventured into product reviews and makeup talk. I don’t think this will ever become a full lifestyle or beauty blog, but I’m definitely having fun with it in this format. I’m kind of excited to see what it’ll evolve into in 2017. Here are a few beauty goals I have in mind, though.

1. Write more
I wrote 175 posts in 2016, averaging about 14 per month. It doesn’t sound like much to me, like I did way more work than that, especially when it started to feel stressful. That said, I’d like to do at least one more post every week.

1b. Write on my other blog more
I have a second blog that I want to start posting to more. It’s been so long since I’ve bothered with it that I don’t even remember the login credentials. I still want a place to talk about myself and my life, a place to seem like I have a life away from my nails.

2. Build a real skincare routine
I still feel insecure about my skin. I’m frustrated that I’m 31 and I still get acne. I want to take every preventative measure I can against wrinkles and anti-aging. I also want to try a 10-step Asian beauty routine. If you’re over 30 with oily skin and hormonal acne, I want your recommendations.

3. Stop competing
I know one of the big rules of blogging is not to compare your success with others’, but I feel so competitive about it. At the risk of sounding whiny, I always look at other bloggers who’ve been working on their blogs for about as long as I have, and watching their blogs grow faster than mine is kind of frustrating. I don’t want to feel like that anymore.

4. Do more real nail art
I love glitter toppers and I think I use at least one every week, but sometimes it feels lazy. I want to go back to the basics: watermarbling, gradients, dotting. I love my glitters, but it’s starting to feel like a cop-out.

I think that’s it! Anyway, I think 2017 is going to be an exciting year, and I’m looking forward to the good times, the challenges, and the time we spend together. Thanks for reading!

Manicure Monday: Pink Holo Stripes With Sprinkles

Happy Monday! I dug deep for today’s mani. I didn’t feel satisfied just putting glitter over polish, so I got the holos out and the striping tape. I should do this kind of thing more often. For this look, I used Elevation Polish‘s Hitsujiyama Park (light pink), Literary Lacquers‘s Laughs in Flowers (pink stripes), Model City Polish‘s Pour Me Another (dark pink), and OPI’s Pink Yet Lavender (glitter). All photos were taken outdoors in direct sunlight.

img_61562

img_61622

With this mani, I just wanted something pink and flashy. I chose three pink holos of varying colors and holo strength; Hitsujiyama Park has the least holo and most opacity, Pour Me Another has a strong holo flame but is pretty sheer, and Laughs in Flowers has fine holo glitters mixed in to create a unique finish. These three polishes, when combined, create a distinct and cohesive look. I’m looking forward to pairing them again soon!

img_61702

img_61742

Pink Yet Lavender is a glitter topper, so I brushed it over the striped nails and sponged it on the others. I have to admit, this wasn’t quite what I expected when I started. In the bottle, the glitter looks more rose gold, likely due to the tinted pink base. On the nail, it pulls silver. I don’t mean to say I don’t like it, but I definitely expected more pink glitter, that’s why I chose all pinks for this mani. Pink Yet Lavender, at least, has some holo glitter in it that helps tie it all together. Also, sponging took a significant amount of product. You can see the fll line on the bottle; this is the first time I’ve used this polish and that’s where it is now.

img_61802

img_61852

mmphswsmm

I am having a lot of fun wearing this, all things considered. The stripes add a fun visual, the glitter adds sparkle, and the holo pushes it over the edge. This took a lot longer than the usual Monday mani, but I’m glad I spent the time on it. I used to push myself really hard to do nail art, and I feel like lately all I’ve been doing is wearing glitter over a base, and that feels lazy. I definitely need to get out of my lazy mani zone.

Hitsujiyama Park and other Elevation Polishes are sold in their online shop. Laughs in Flowers was an Addicted to Holos box exclusive from March 2015 and is no longer available; other Literary Lacquers are sold in their etsy shop. Pour Me Another is also a long-gone limited edition; other Model City Polishes are for sale on etsy. Pink Yet Lavender is also discontinued; OPI is sold in stores nationwide.

I bought these polishes myself.

Birthday Mani Digest 2016

Welcome back, reader! As you know, I took a bit of time off these past couple weeks to celebrate my birthday. It was only supposed to be one, but the arrival of Hurricane Matthew led to everything being postponed. That madness is now over, and now I’d like to show you what my nails were up to during the downtime. If you follow me on Instagram, you’ve seen most of these lovelies already. I promise I will not be mentioning my birthday again until next October.

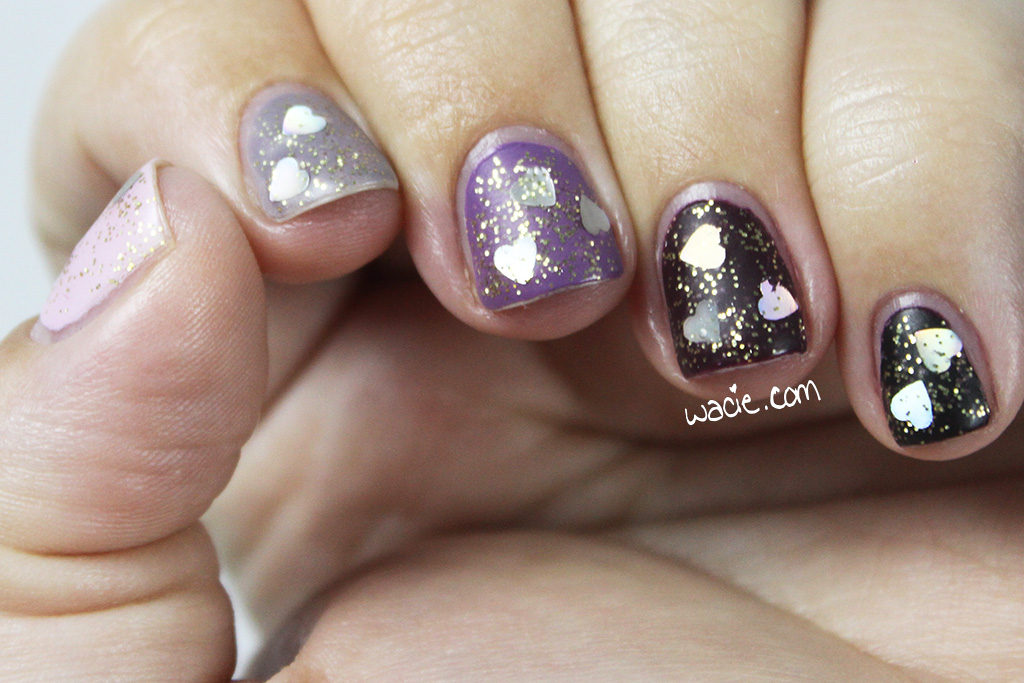
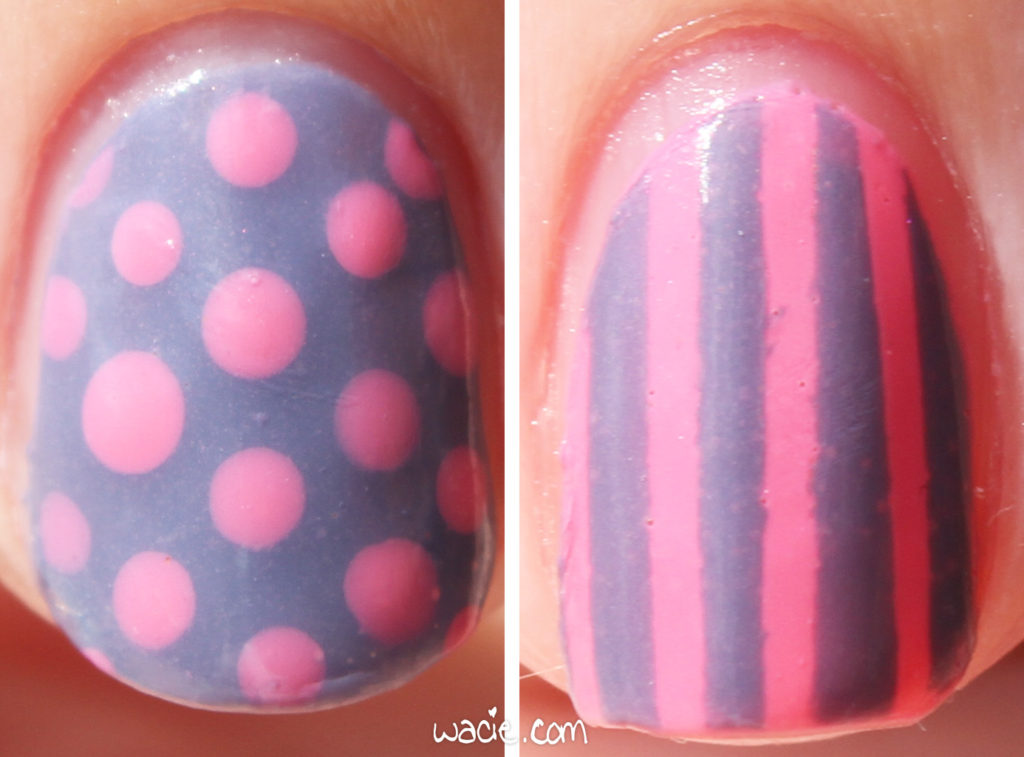
Birthday Mani #1: Pink Frosting With Sprinkles
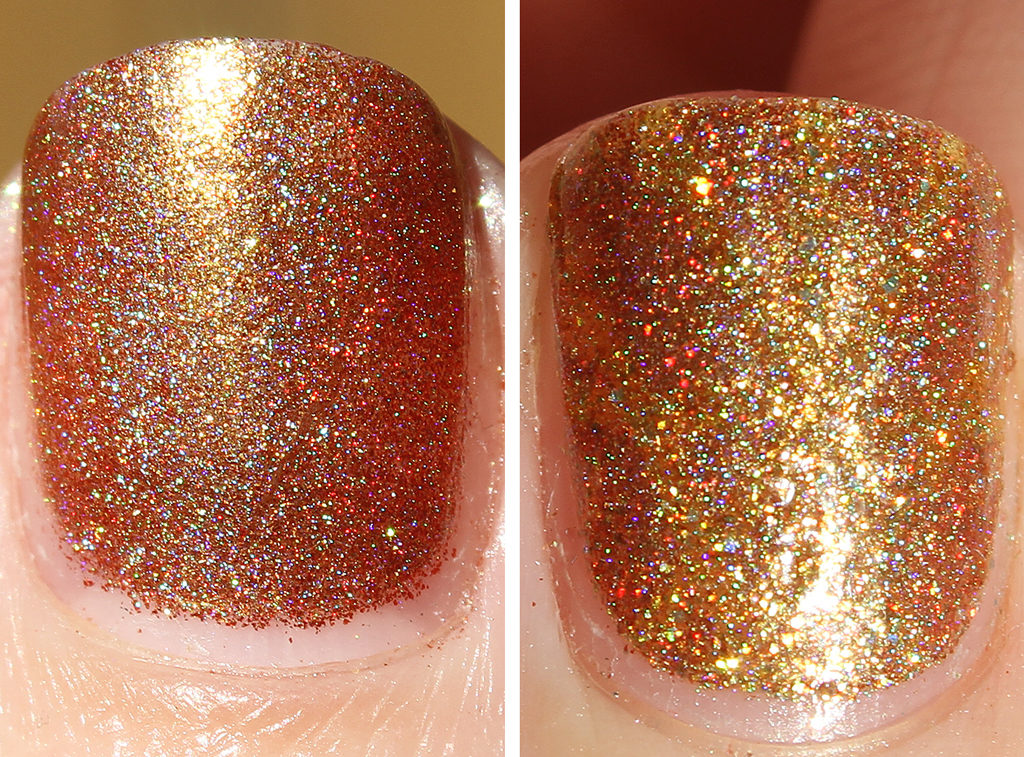
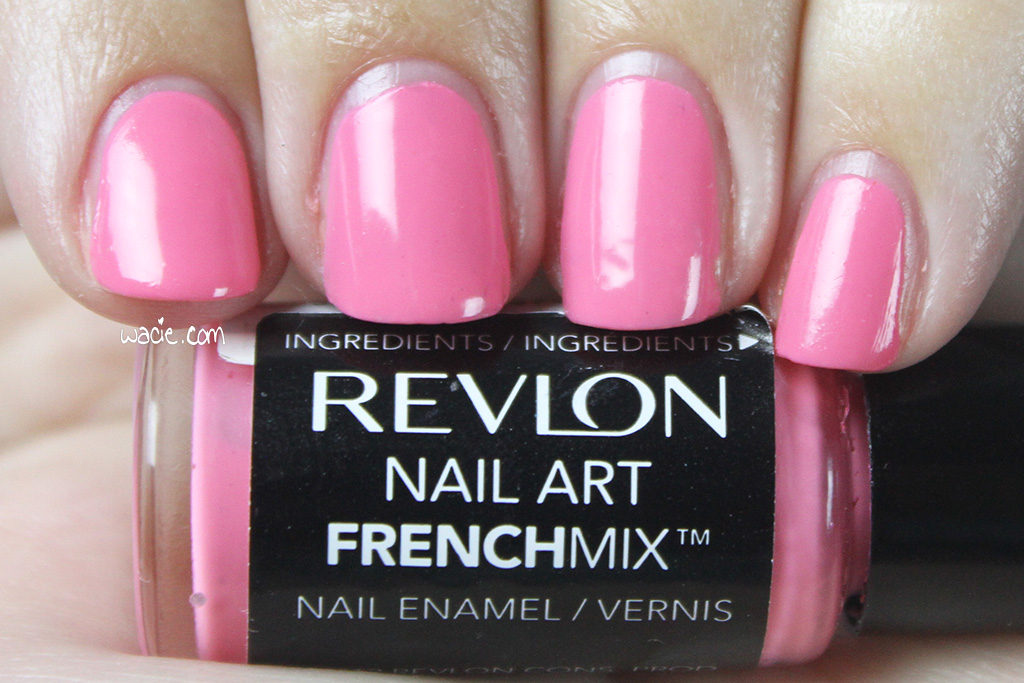
Essie’s Good Morning Hope with Lynnderella‘s Icing Glass Garland

img_5668i

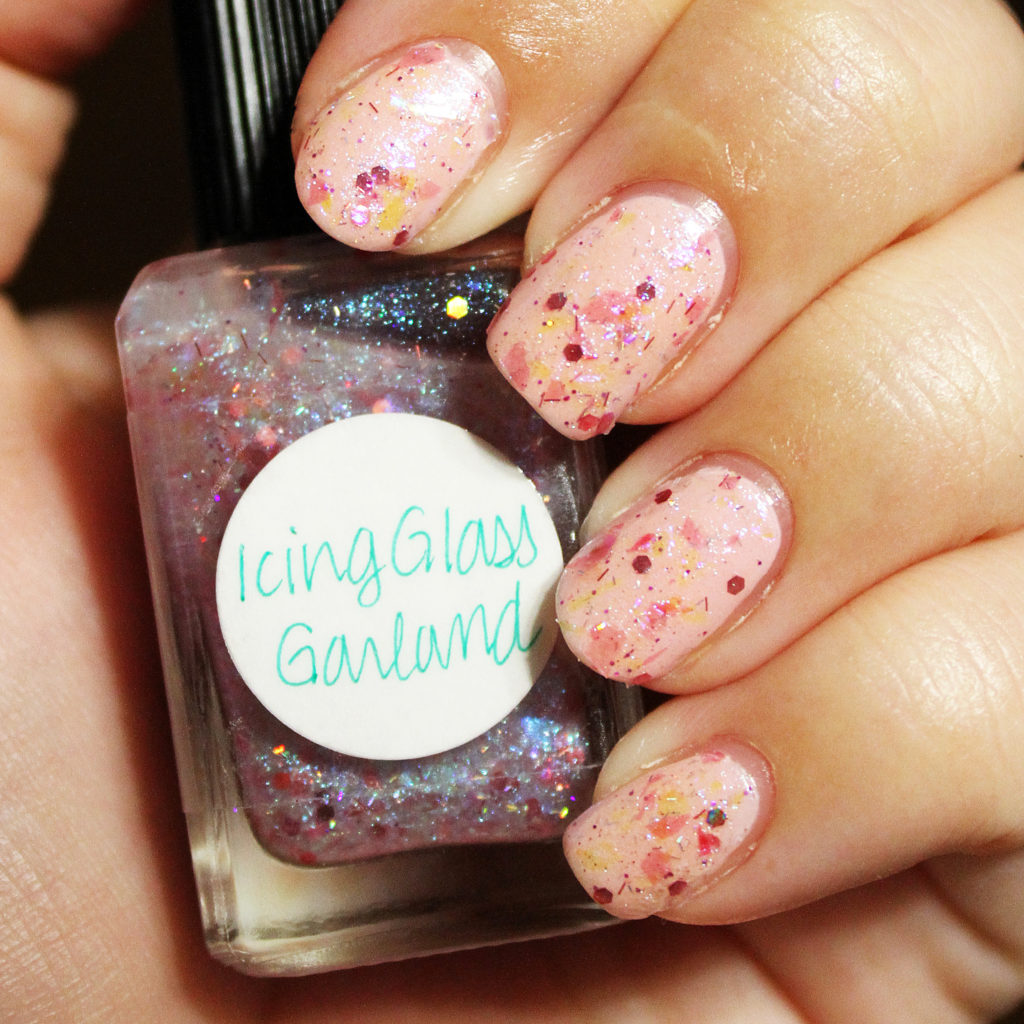
The first birthday mani was a fun warm-up with an untried Lynnderella topper. I had a lot of fun wearing this; Icing Glass Garland was a lot more interesting in real life, however. There is a lot of iridescence and color-changiness. It doesn’t look like much over Good Morning Hope, but it still made for a fun and dainty look.

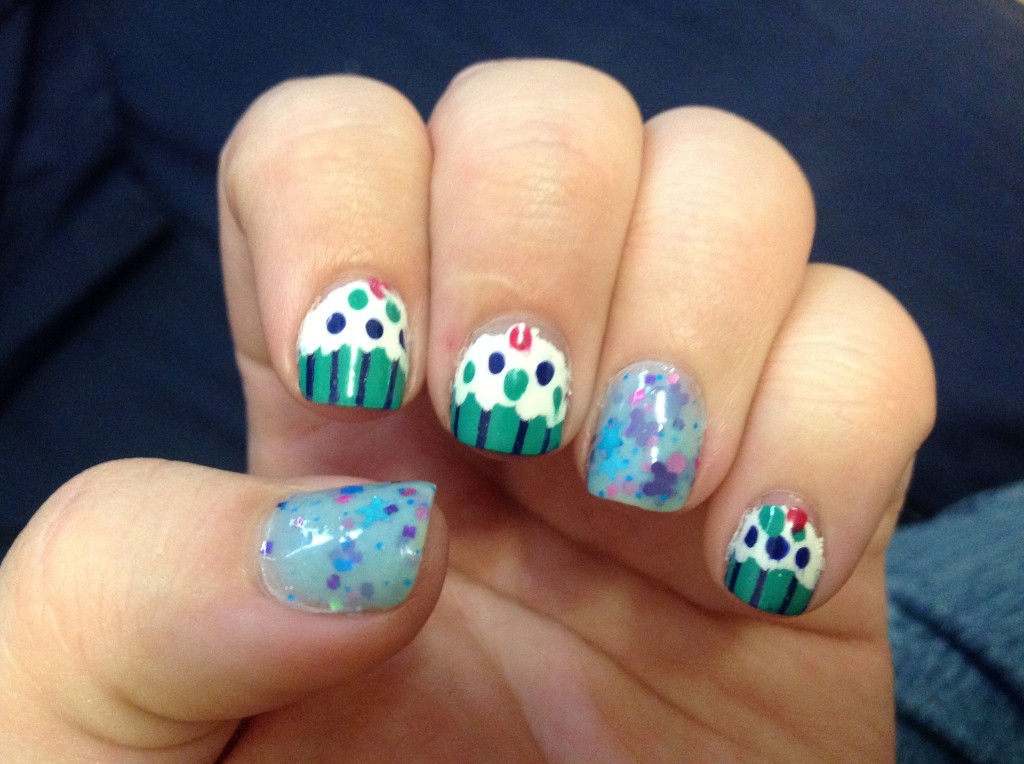
Birthday Mani #2: Cupcakes
Blue-Eyed Girl Lacquer‘s Eleanor, China Glaze’s White on White, LA Girl’s Black, Orly’s Water Lily, P2’s French Kiss, Ciate’s Pillow Fight

img_56872i

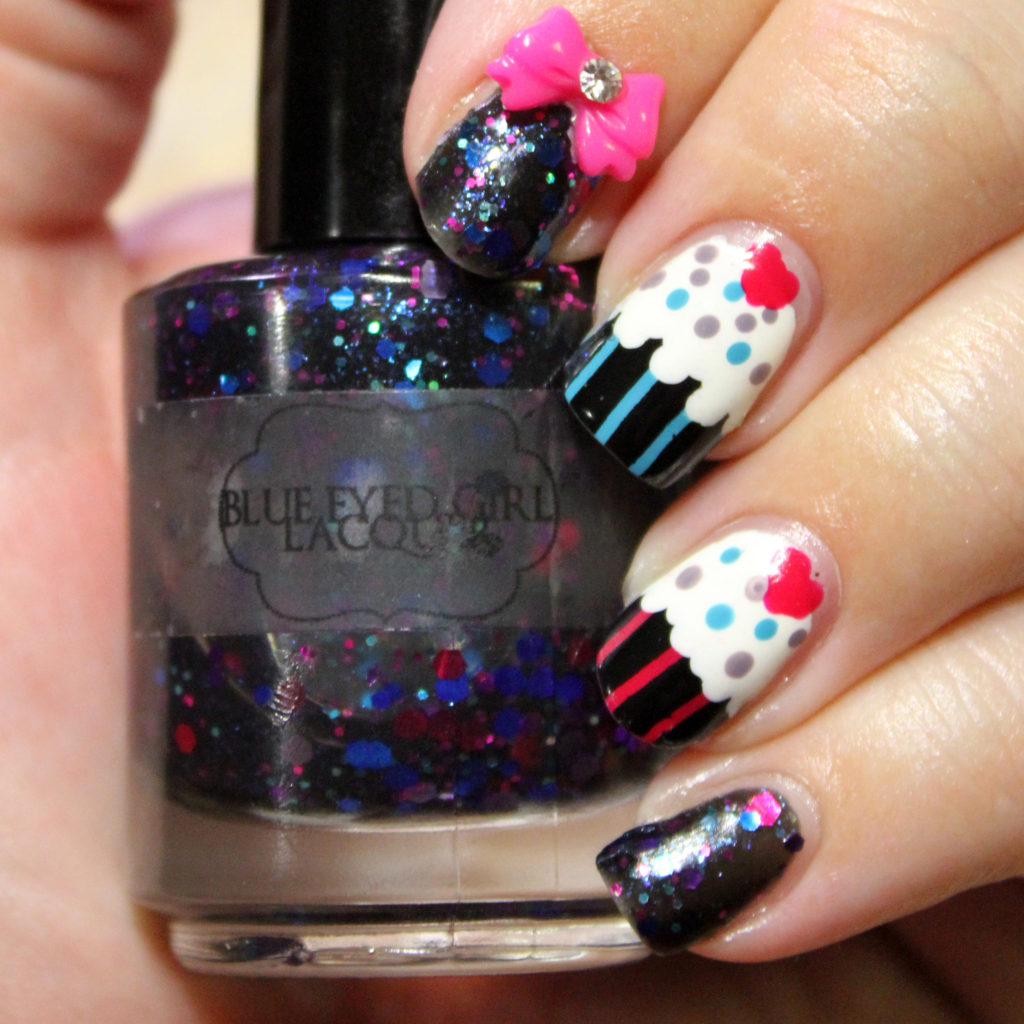
I always do cupcakes to celebrate my birthday, and this year’s mani was actually done in the middle of the hurricane. Even though the hurricane was an unwelcome birthday event (thanks, universe), we still had a good time. A lot of our friends live in evacuation zones and came to stay with us when the call came to evacuate, so we still had a party and ate food and played board games. It was not the worst experience.

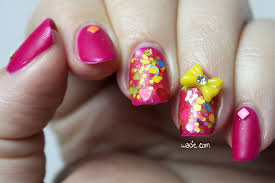
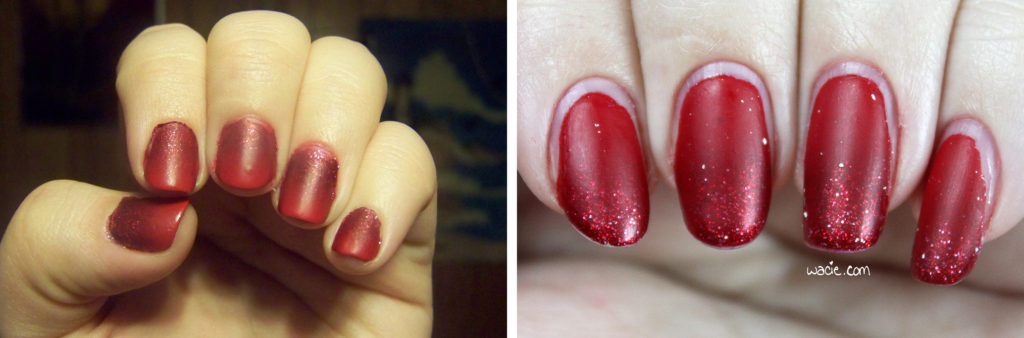
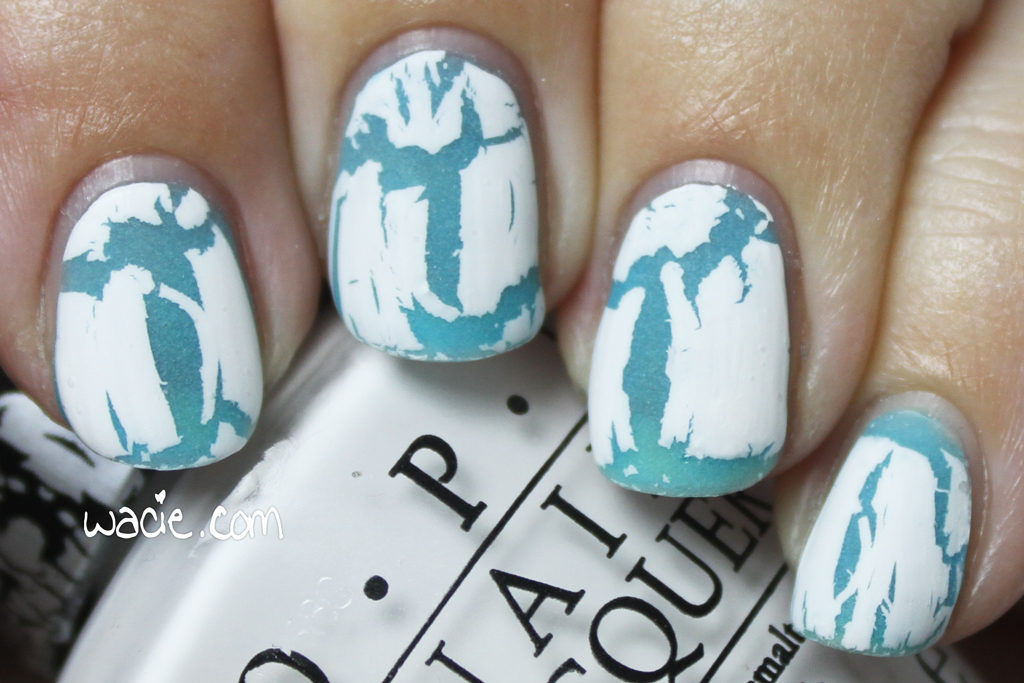
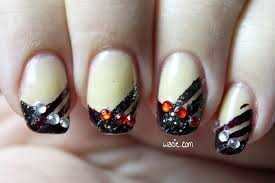
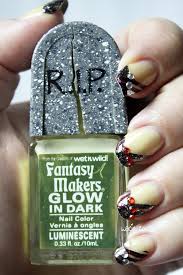
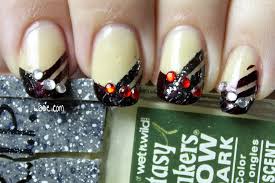
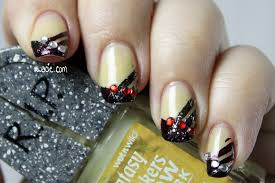
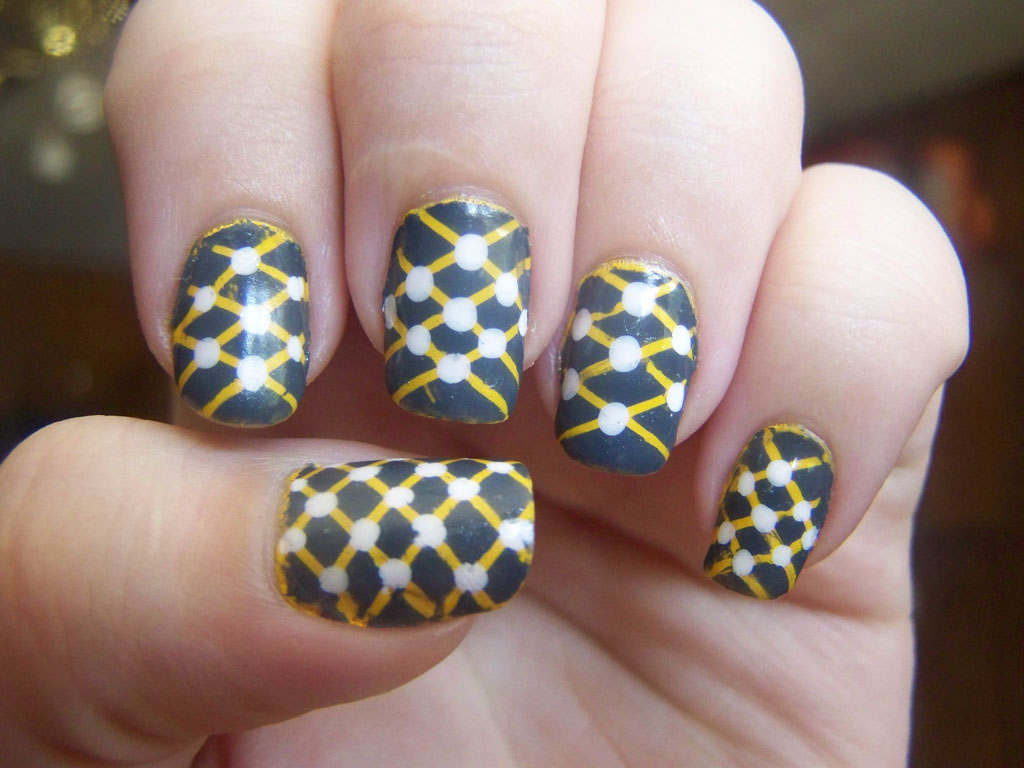
Birthday Mani #3: Hello Dalek
Digital Nails‘s Hello Dalek

img_57352i

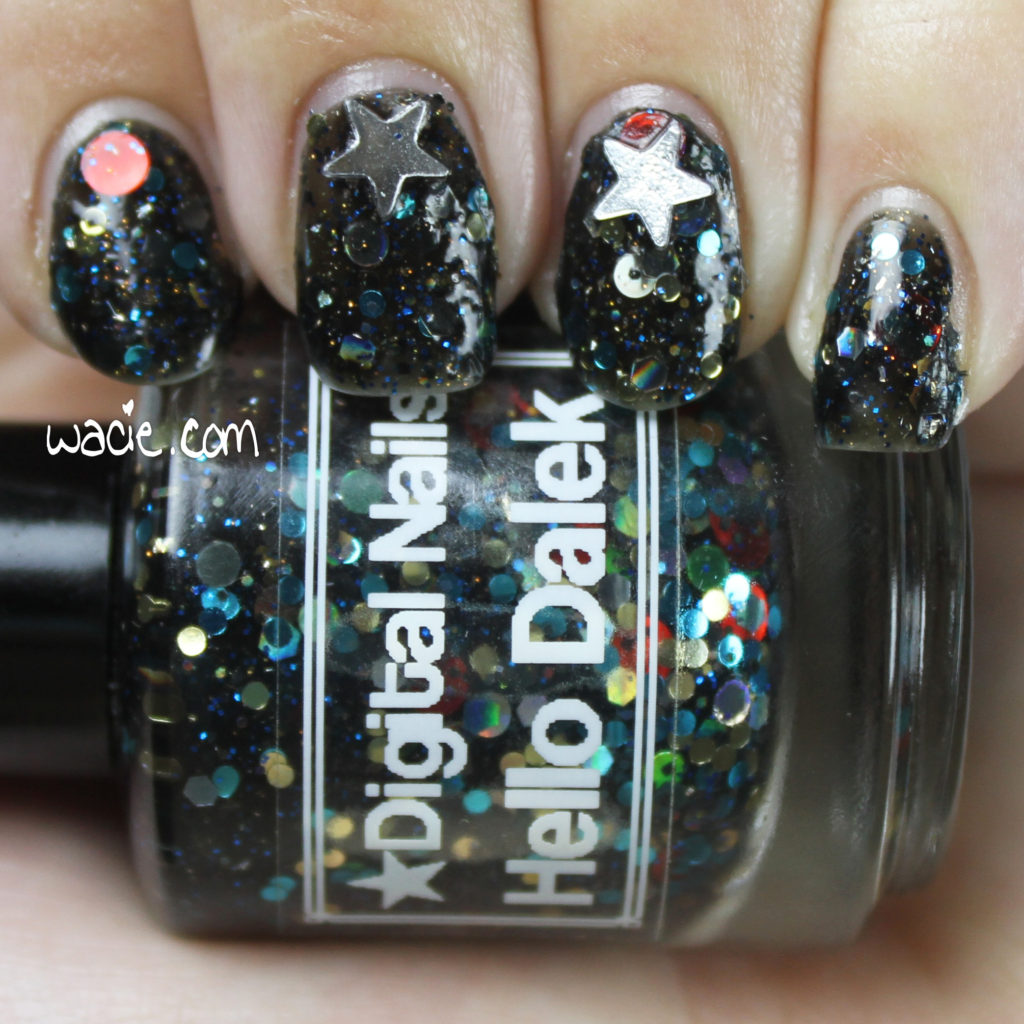
This was last week’s Manicure Monday post, but I’m including it for continuity. Monday was my actual birthday, and it was a ton of fun to wear a party on my nails as well. When your birthday is on the worst day of the week, you have to party any way you can.

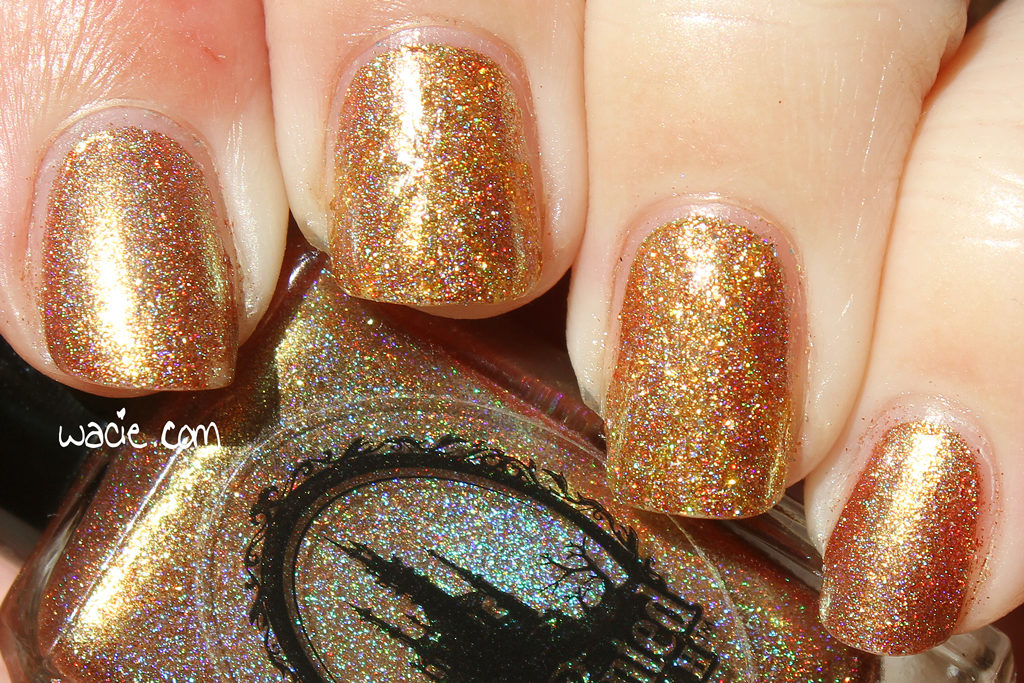
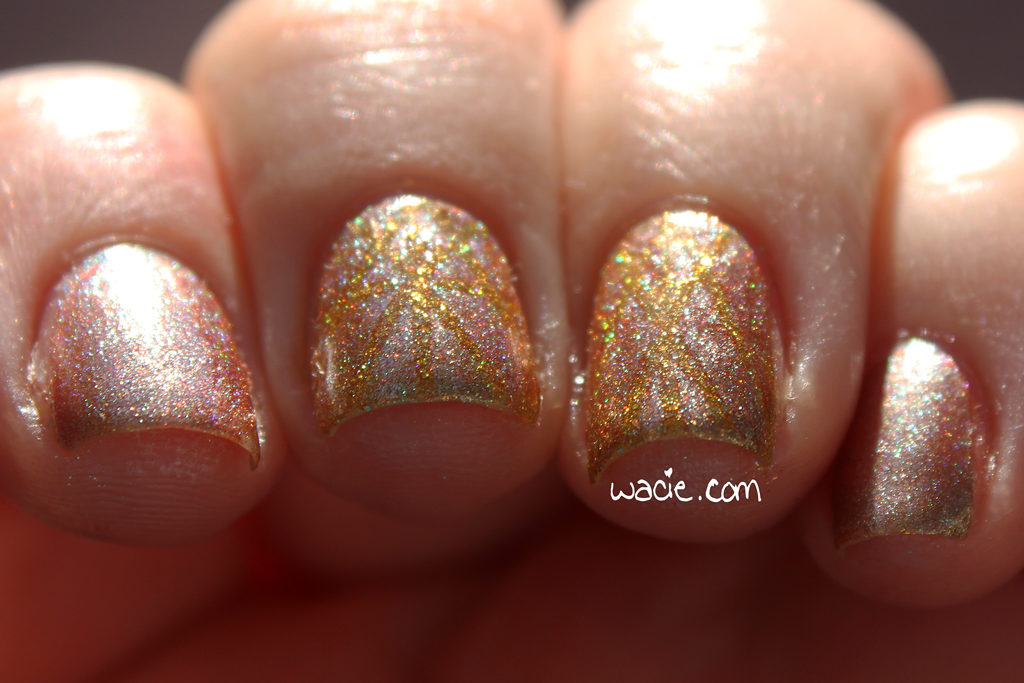
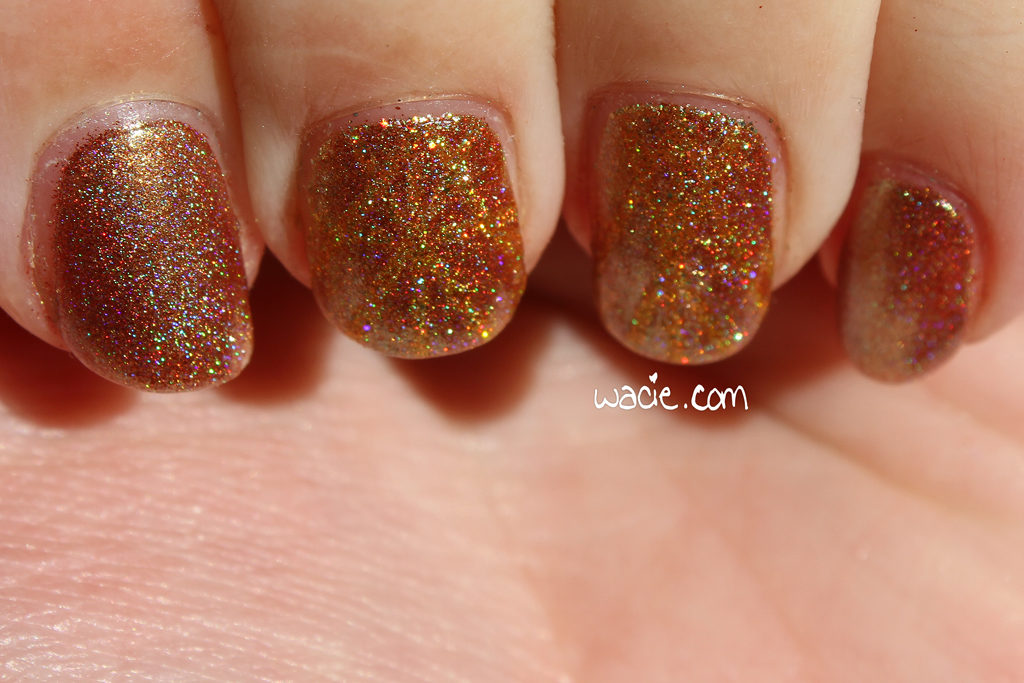
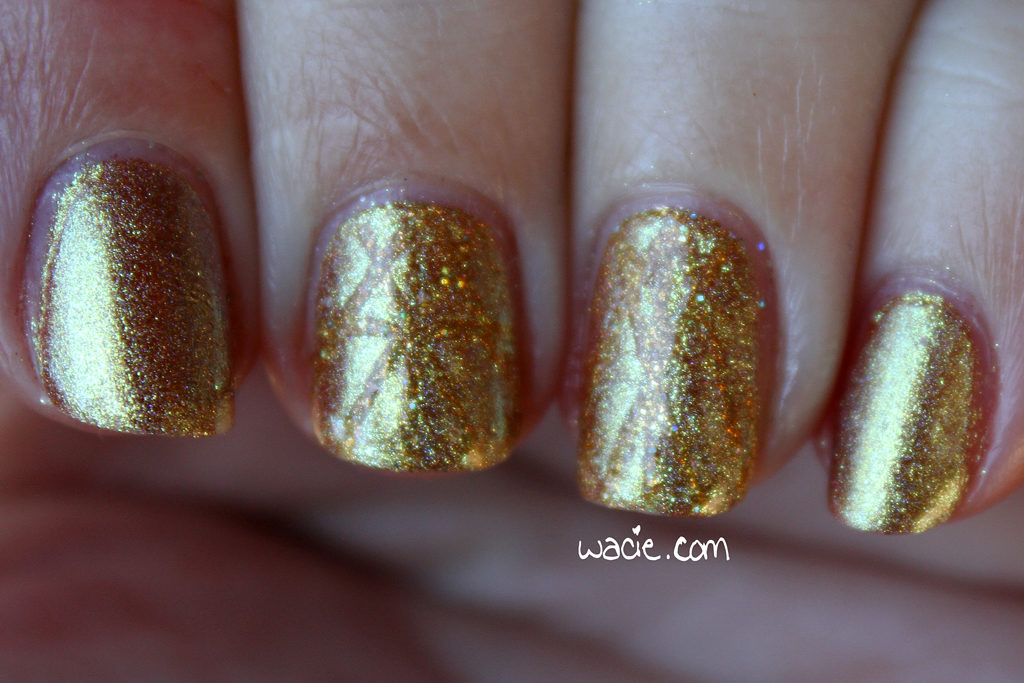
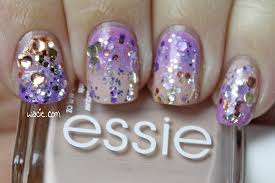
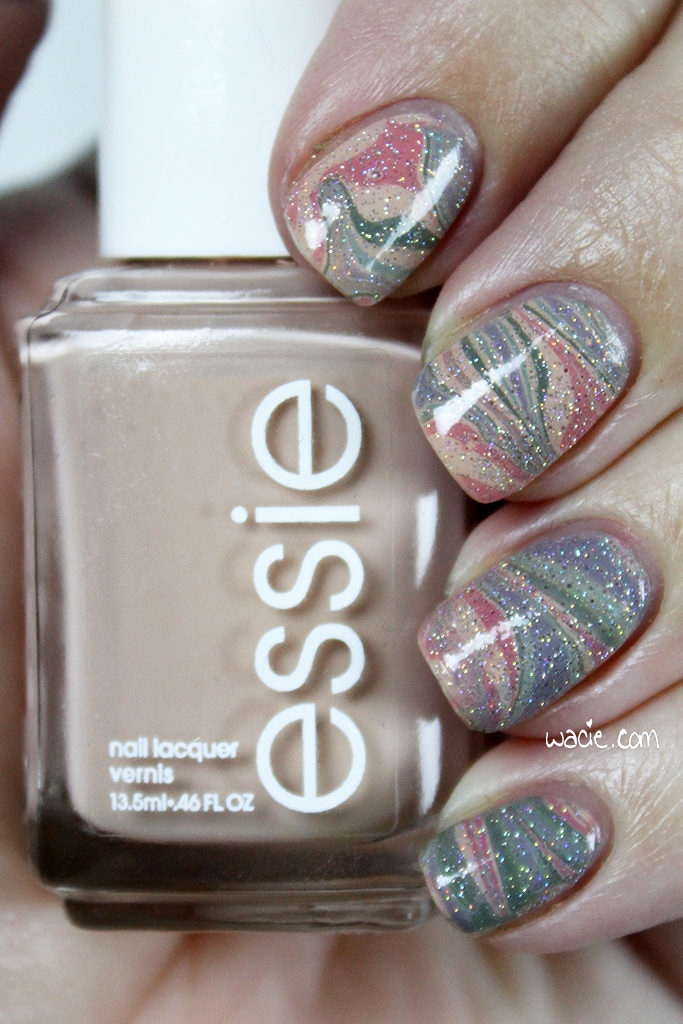
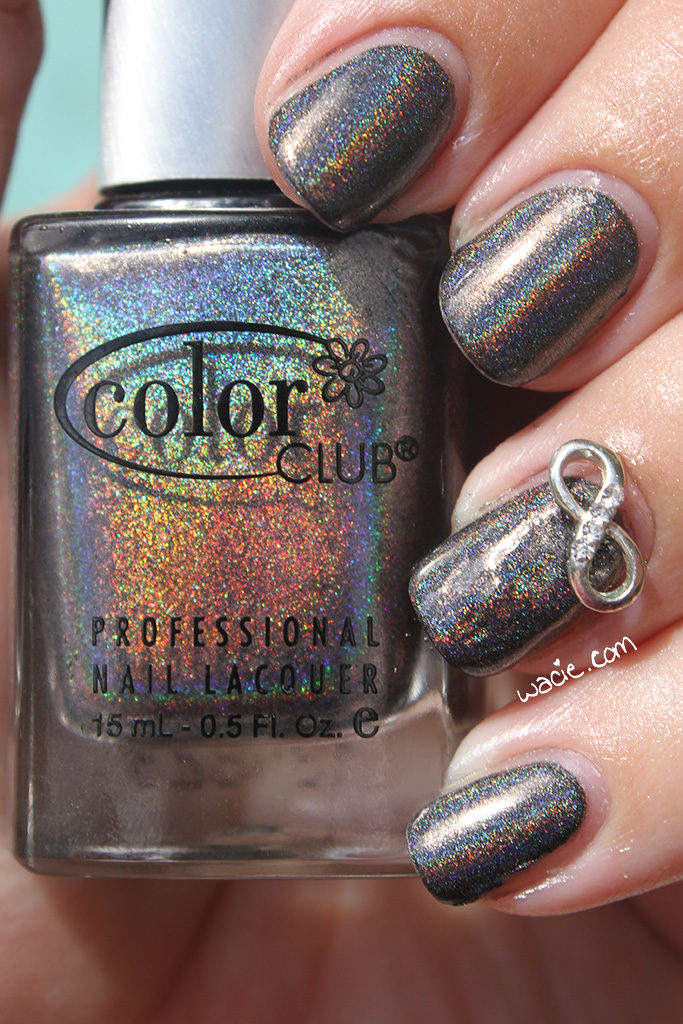
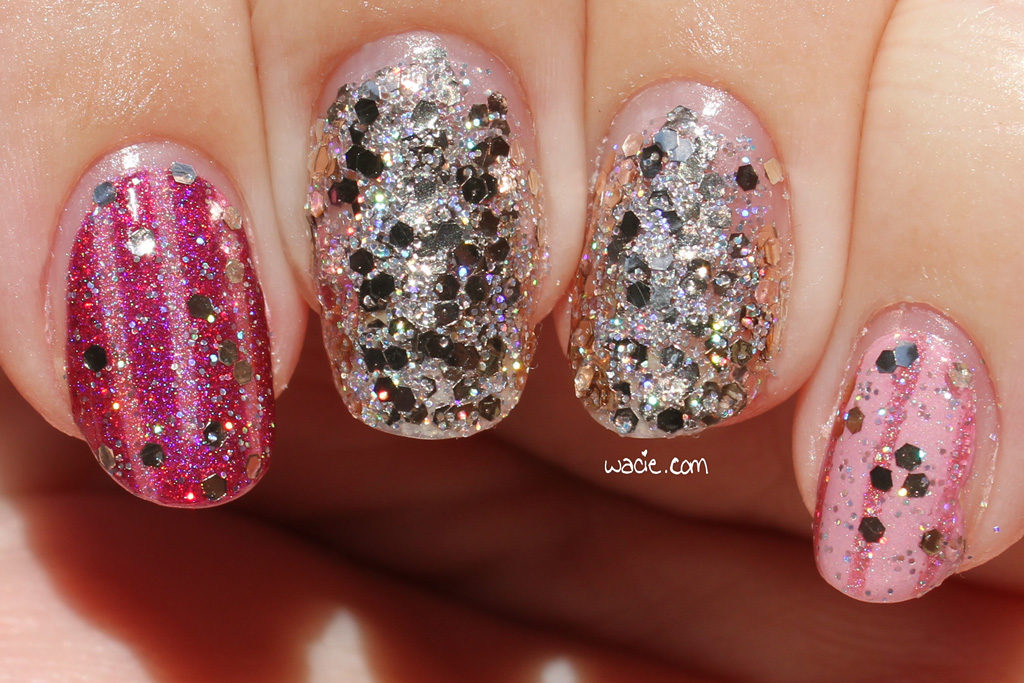
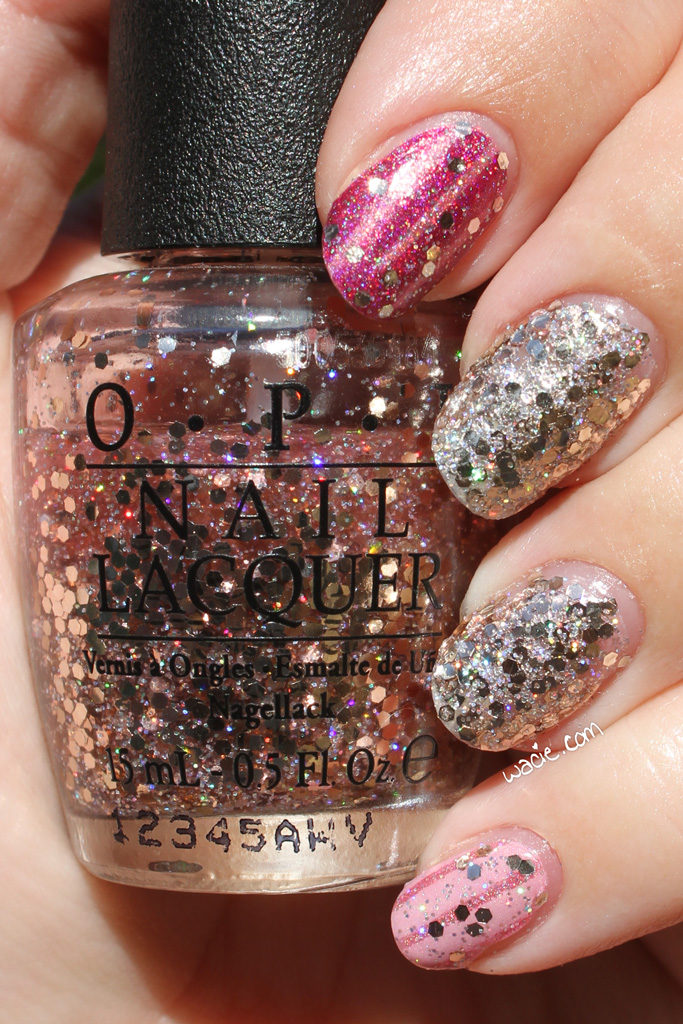
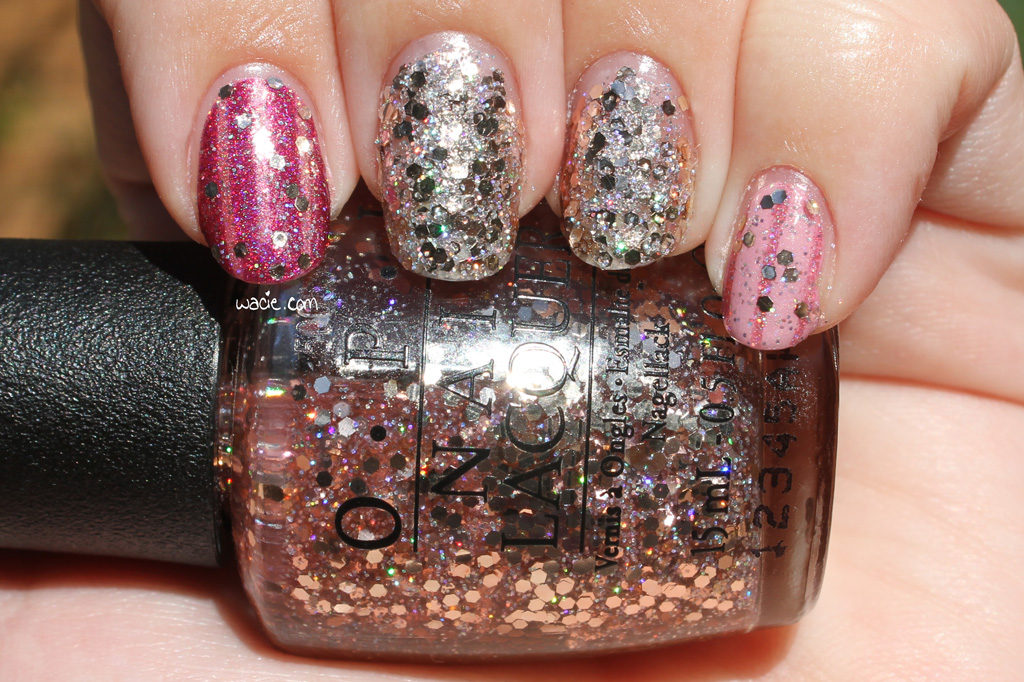
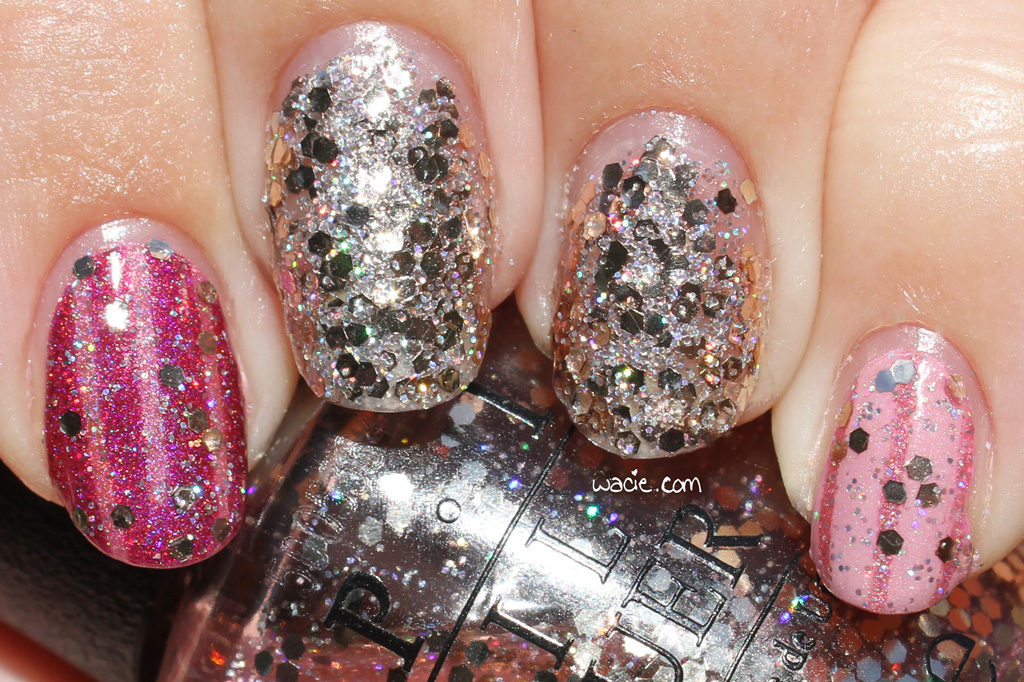
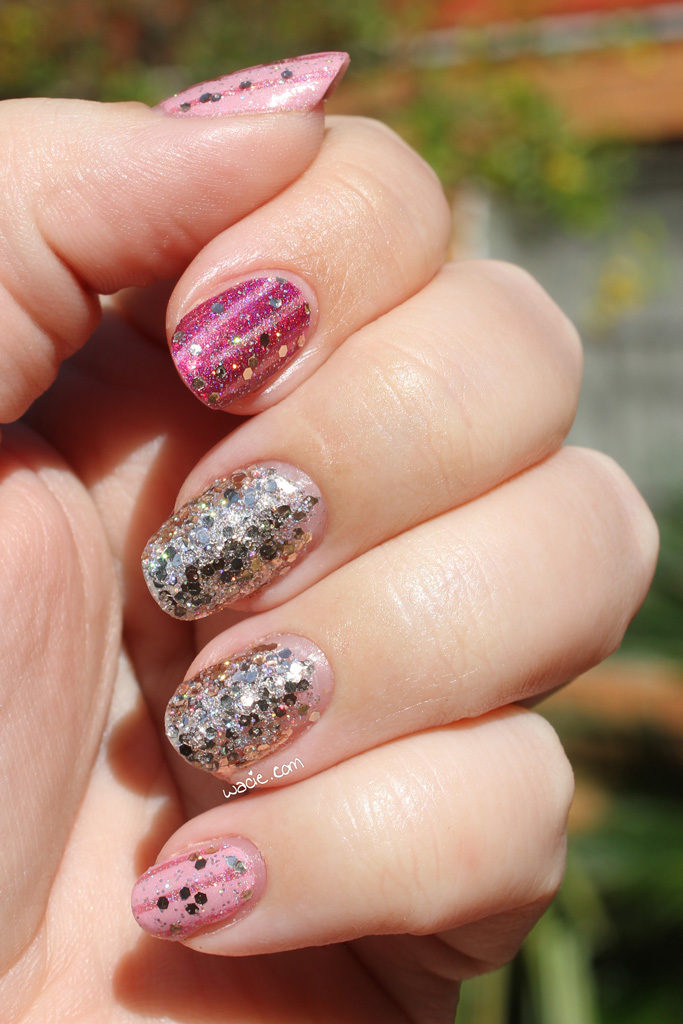
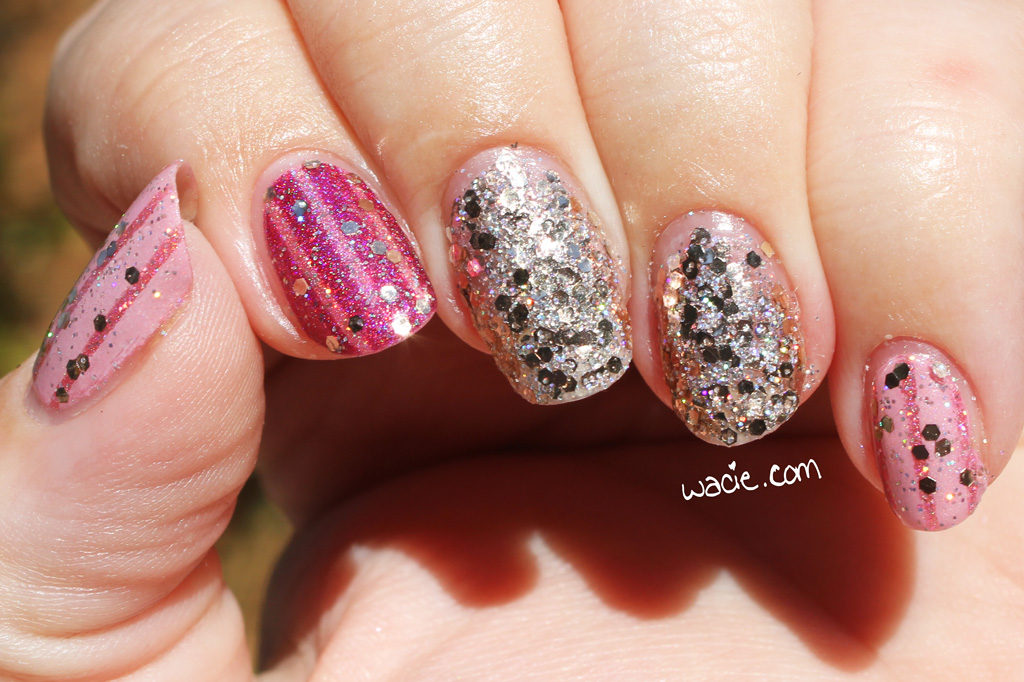
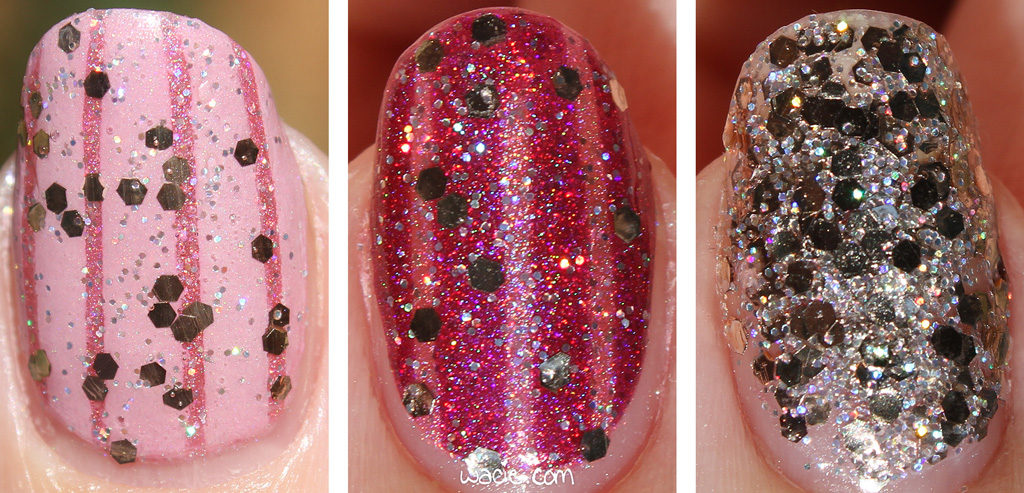
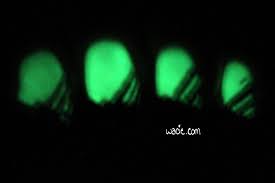
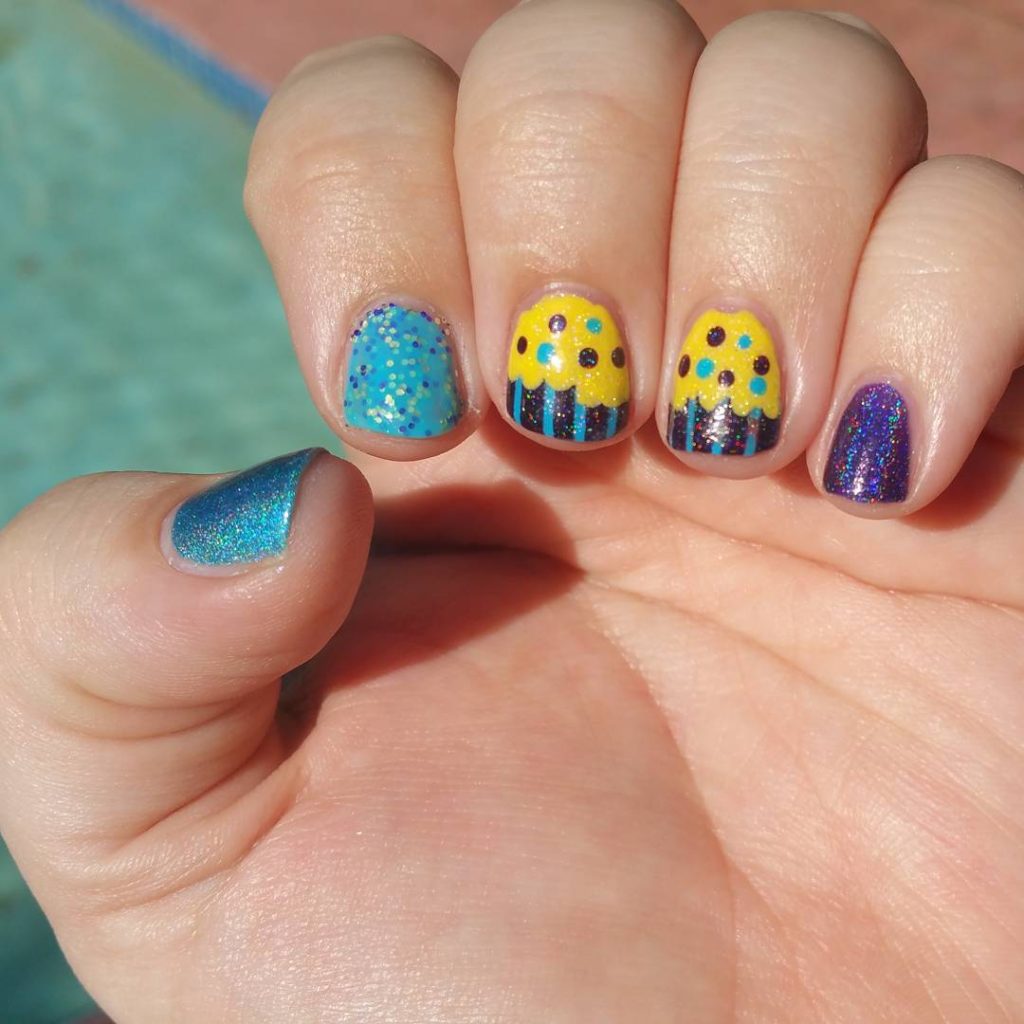
Birthday Mani #4: Glitter Frosting
Digital Nails’s Pandorica, Model City Polish‘s Sheena is a Punk Rocker, Wacie Nail Company’s Your Daring Escape, Blue-Eyed Girl Lacquer’s Walk Through the Tulips
img_57562

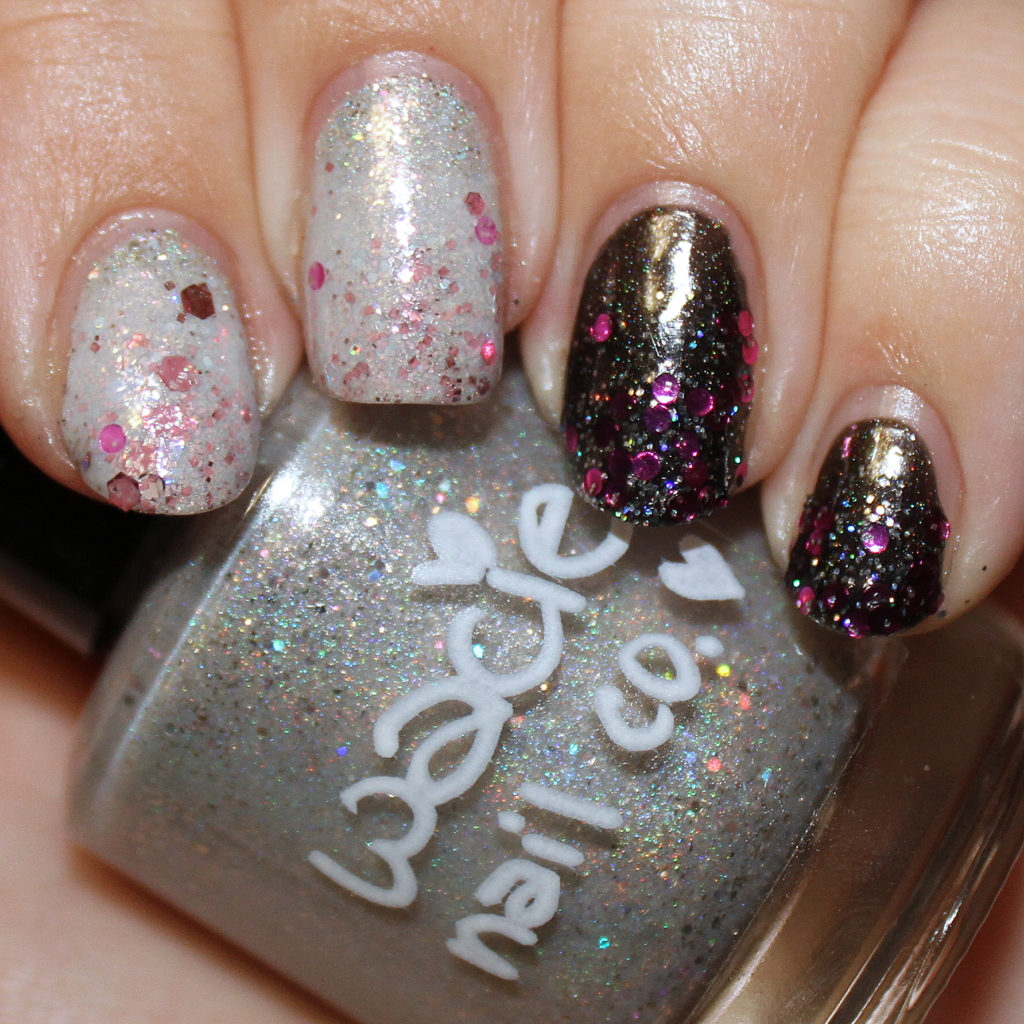
This look includes the polish I made myself for my birthday! Your Daring Escape is a silvery-white holo with holographic glitter and pearl pink and metallic silver flakies. I wanted a holo-meets-glitter-gradient look, but as the sun never came out that day, a lot of the beauty got lost.

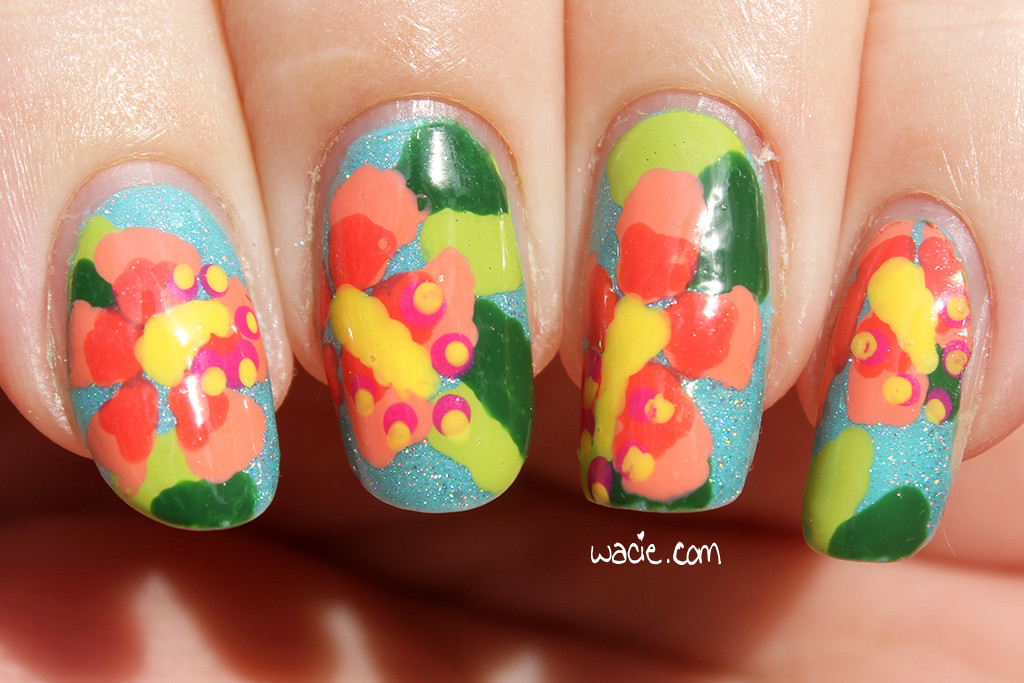
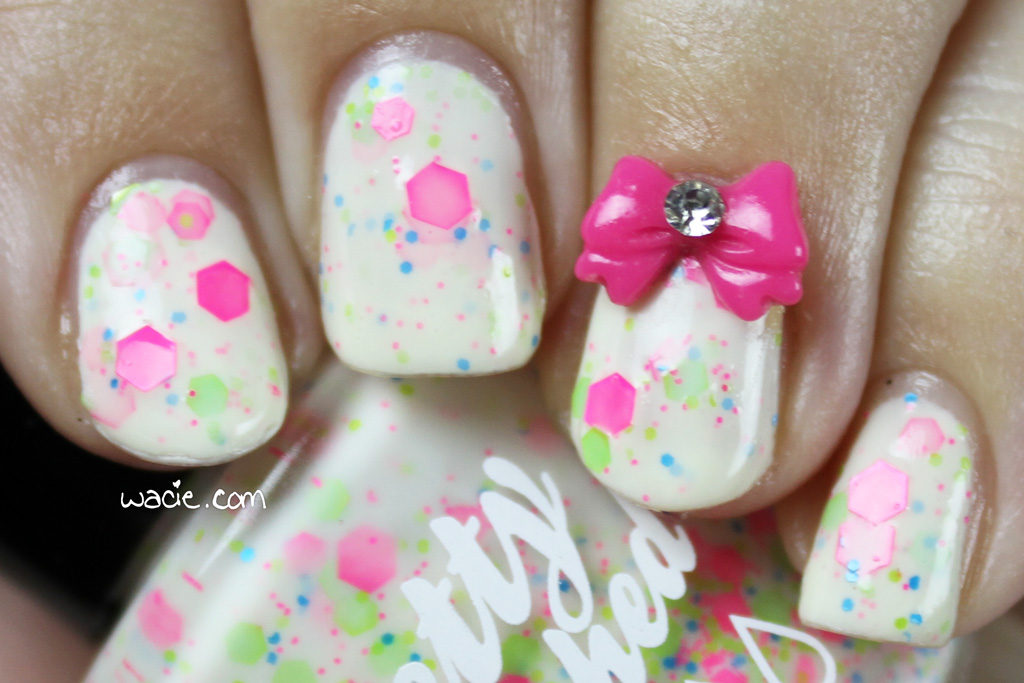
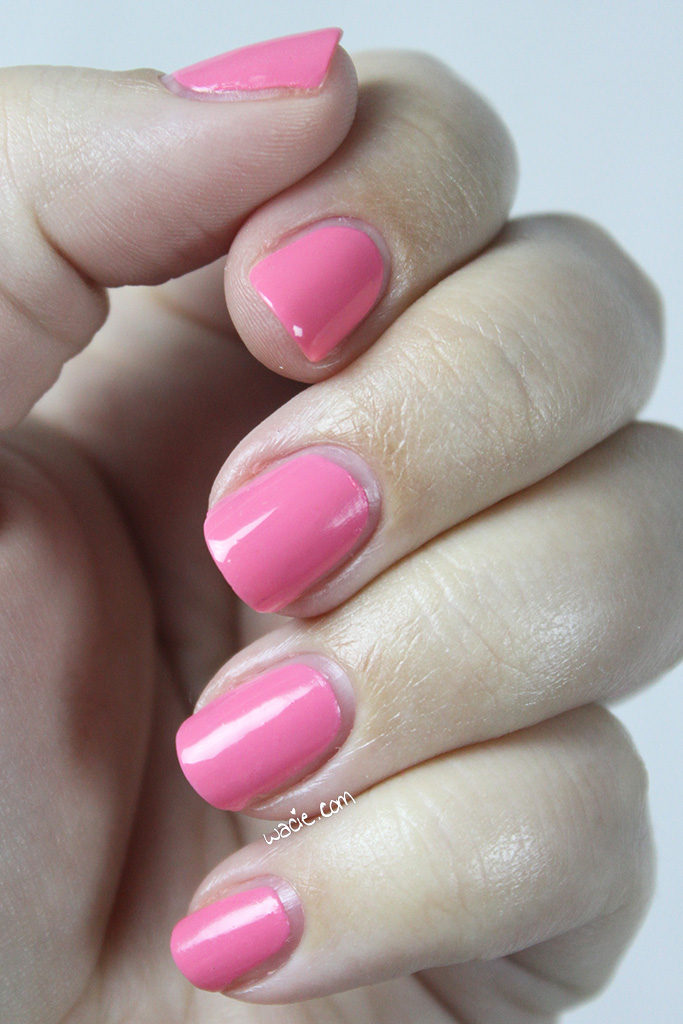
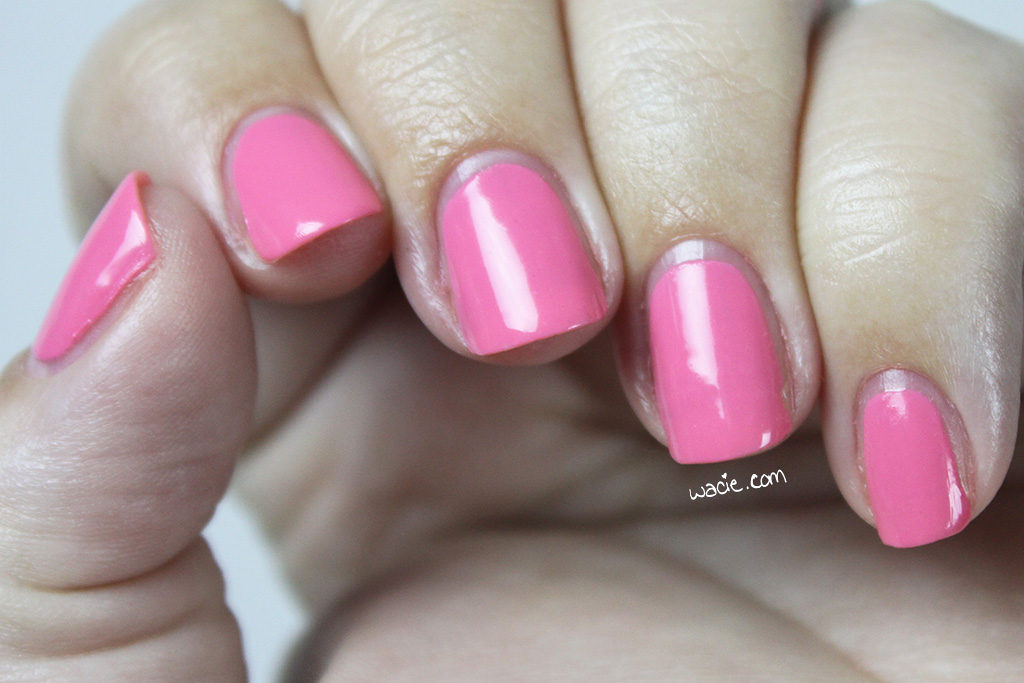
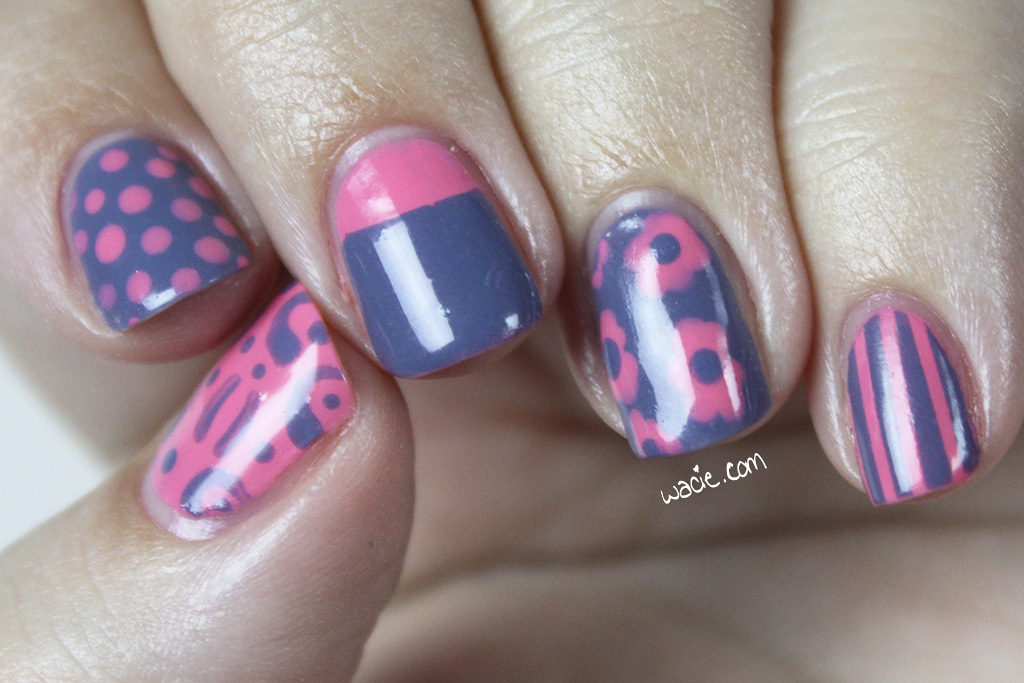
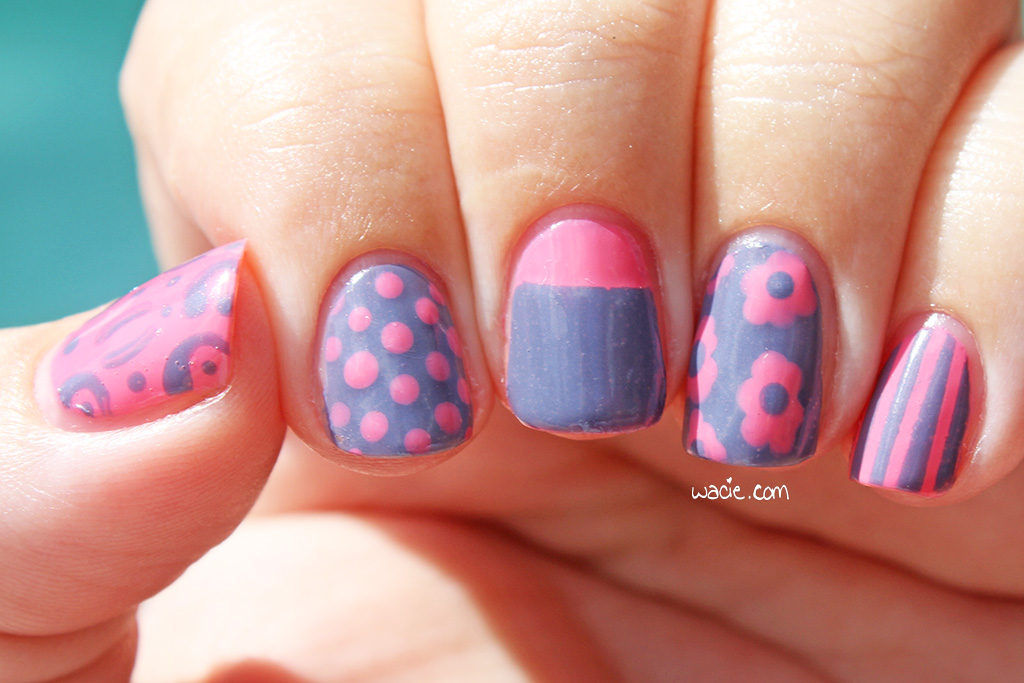
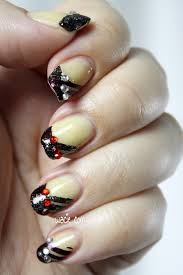
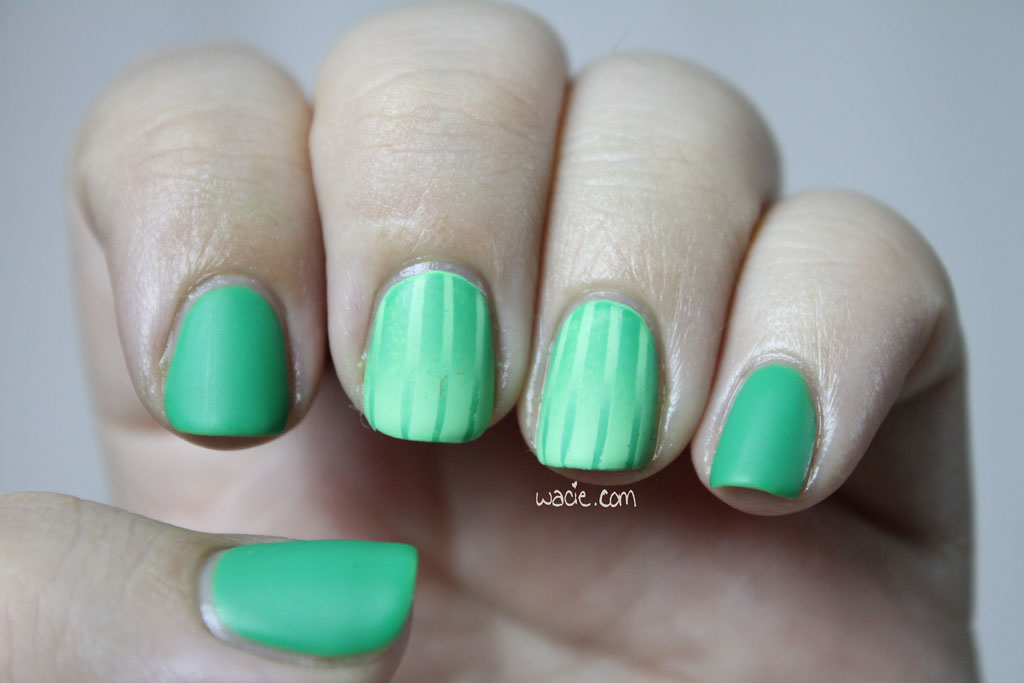
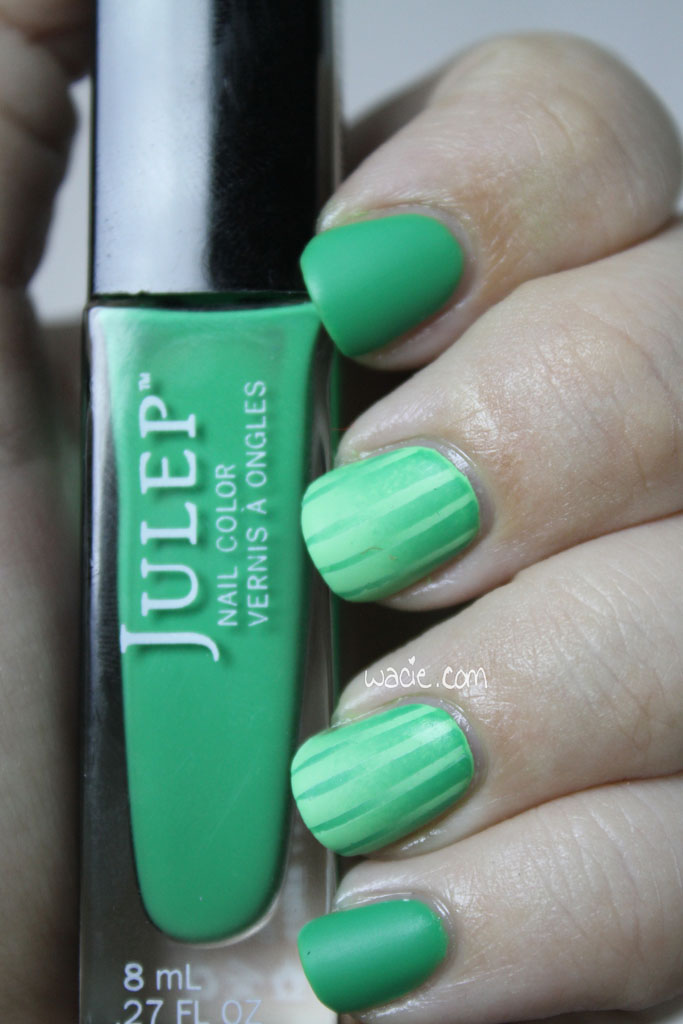
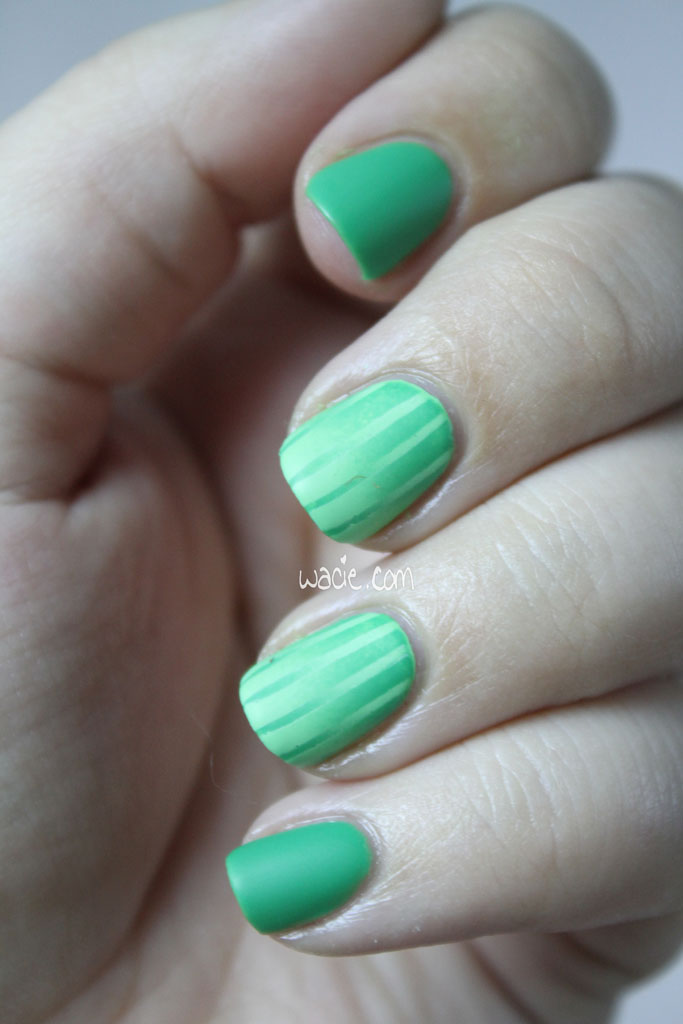
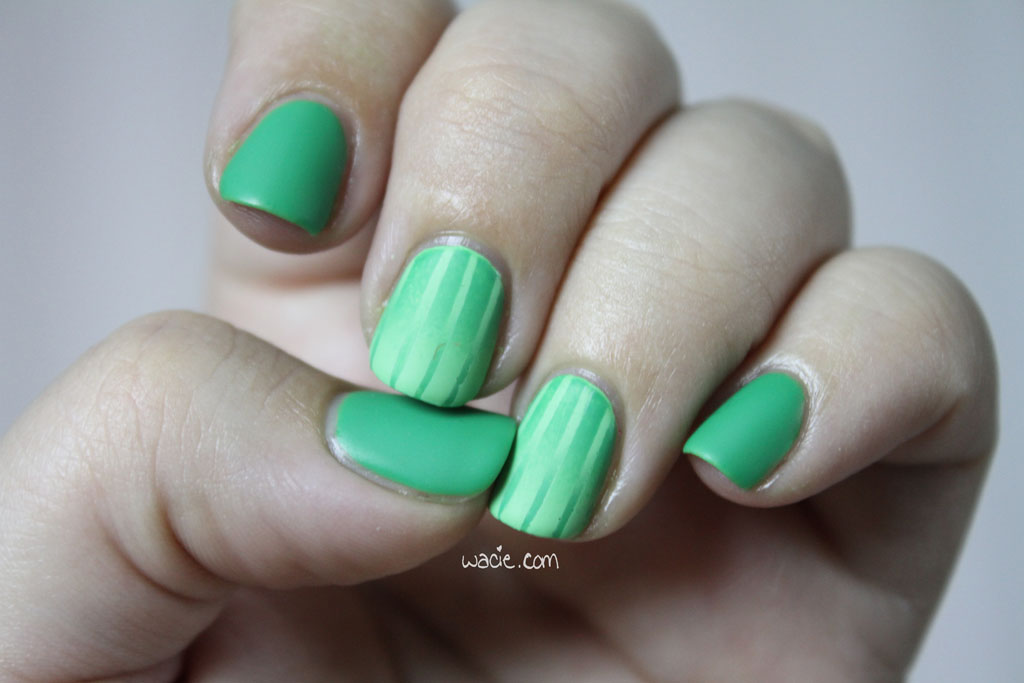
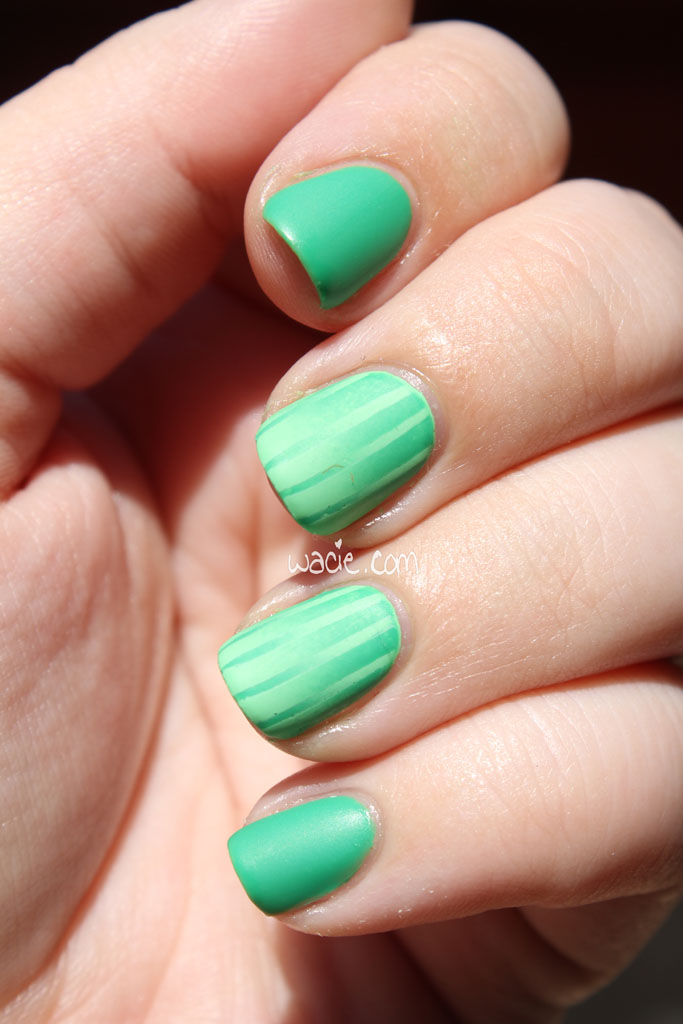
Birthday Mani #5: Stripey Blue Frosting
Literary Lacquers‘s Bluestocking Romance, Hard Candy’s Sky, China Glaze’s Mosaic Madness

img_57912

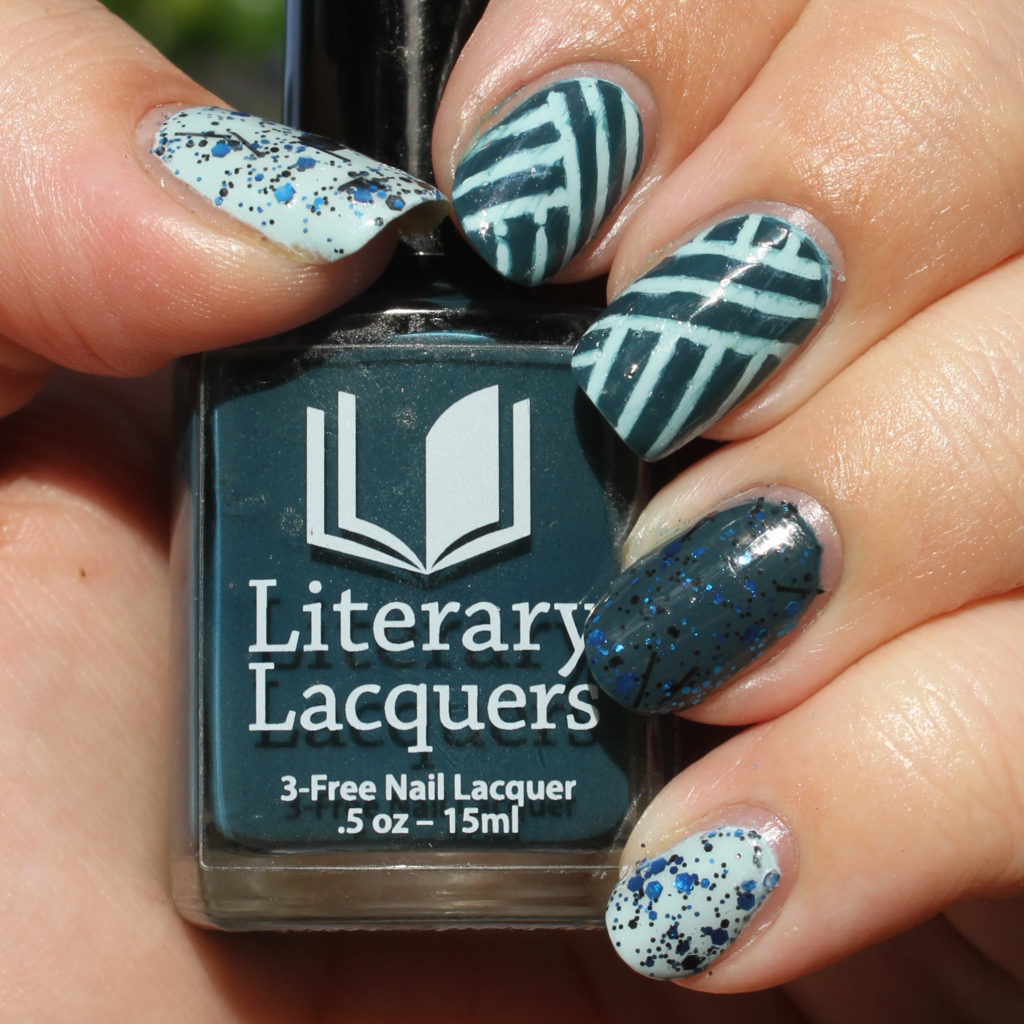
This was the mani I got the most compliments on for sure. I’d always wanted to do this moving stripes design, and this was the day I felt like dealing with the striping tape. It came out so much better than I expected it would, though I’m a little disappointed it smeared a little with the top coat. I’d totally do it again.

I also want to take this time to share some birthday manis of years past. I realized at some point that I’ve been doing the annual cupcake mani for five years now; the annual cupcake mani predates wacie.com, even. I love doing little retrospectives like this; if I’ve learned anything from this, it’s that my cupcake painting skills have gotten only marginally better.

2012
Colors Unknown, but probably all Sinful Colors

ir92y

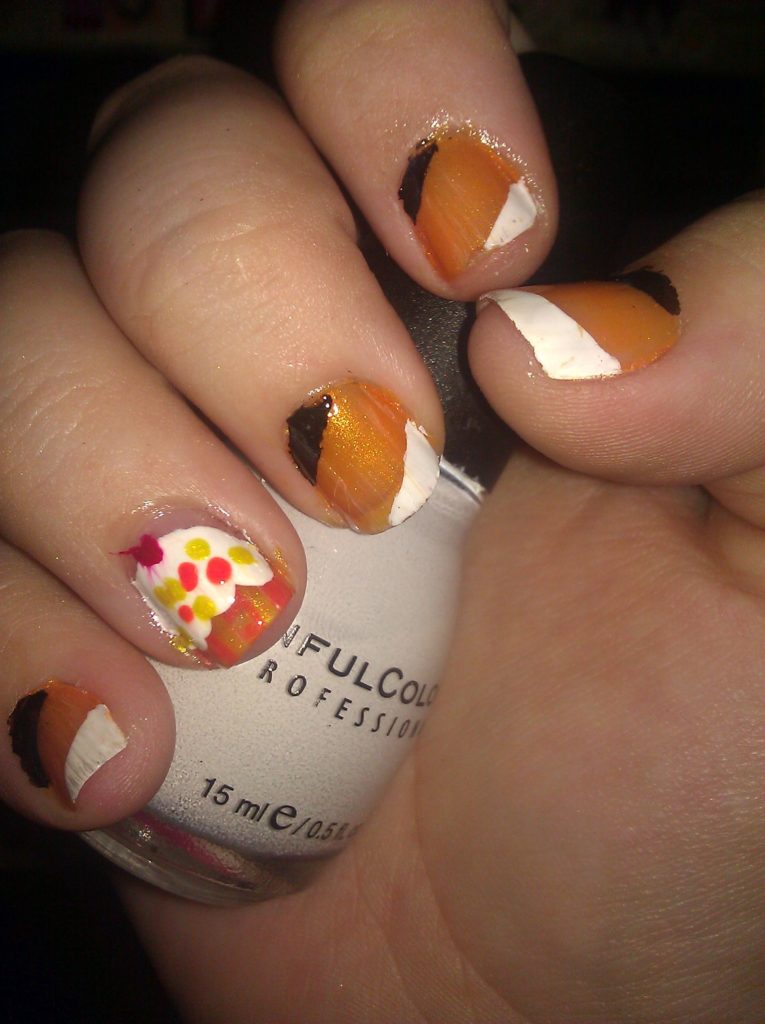
Look at this. I almost don’t even want to share this, but we all have to start somewhere, right? I do remember waiting practically all day for the dots to dry, and they still smudged when I put the top down. Not only was this before wacie.com came to be, but I think it was also before the days of quick-dry top coat. Those dark, dark days.

2013
Sally Hansen’s Mint Sprint, OPI’s Eurso Euro, P2’s French Kiss, Sally Hansen’s Hard to Get, Blue-Eyed Girl Lacquer’s Floppy. Hoppy. BUNNIES!

photo

These look more like mashed potatoes than cupcakes. This was my first birthday post on the blog. Going back and reading the post, about it, I completely forgot all that stuff happened! I do remember doing this mani in Boyfriend’s tiny Atlanta living space, trying not to bother him and his roommate with nail polish smell. I got acetone on his desk and ruined the varnish. I still feel bad about that.

2014
Blue-Eyed Girl Lacquer’s Dawn Breaks and If You’re a Seascape, Indigo Bananas‘s Moonlight (Clair de Lune), P2’s French Kiss, American Apparel’s Neon Pink, Essie’s Fiji, Ciate’s Candy Floss

IMG_02002

That P2 polish finds its way into every birthday mani, doesn’t it? I loved this look a lot. I totally wore it to a fancy restaurant. Here’s the post!

2015
Blue-Eyed Girl Lacquer’s Ocean Warmed by the Sun, Digital Nails’s Purple Reign, Nails Inc.’s Pudding Lane, Hot Topic’s Light Blue, Estee Lauder’s Black Plum

12145279_905705656183566_853061513_n

This is last year’s mani, and the mani that celebrates the big 3-0. This was also one of the last photos I took on my phone before Drunk Me left it on top of the car and broke the camera forever. Good times!

Again, a huge thank you to everyone who wished me a happy birthday; I cherish all of you! Thank you so much for tolerating all of the birthday posts.

Pretty sure I bought all these polishes myself.

Swatch Sunday: Revlon’s Sweet Revenge

Happy Sunday! Today’s post is a little different from the usual Swatch Sunday business, because we’ve got a twofer as the polish this week. Revlon’s French Mix set comes with two colors and encourages you to do some nail art with them. This set is called Sweet Revenge. In the photos below, I’m wearing three coats of each polish with one coat of Seche Vite top coat.

IMG_13192

IMG_13242

IMG_13952

IMG_13912

Before I talk about the polishes, I want to talk about the packaging, because it directly affects the quality of the polish. While this double-ended polish brush seems really stylish and convenient, I’ve had nothing but problems with them. The brush caps break and stops fitting inside the brush cap, or the polish itself dries out. Either way, the polishes end up becoming unusable. When I took this one out to use it, the brush to the purple polish was broken, and the pink polish was totally dried out. If you have any of these polishes and you hate the packaging as much as I do, you may be pleased to know that the brushes and caps from mini polish bottles from TKB Trading are the same size and will fit very well. This is how I was able to separate mine and save the polish inside.

The pink in this set, as I mentioned, was totally dried out, but I saved it with polish thinner. Because of this, and because I had to use so much, I can’t speak for the consistency of this polish, or what it was like before I had to thin it out. When I applied it, it was on the thinner side, and required all three coats for full opacity.

IMG_13372

IMG_13382

IMG_13452

The purple polish is very opaque, and achieved full opacity by the second coat. The pink shimmer, though fine, appears best in lower light; the studio lights washed it out a bit. The purple polish was the best suited for nail art because of its opacity. Both polishes dried quickly with glossy finishes.

IMG_13862

IMG_14012

IMG_14052

IMG_14102

I did a quick skittle mani just to see how well each one works for actual nail art. The pink, though it does work for some things, isn’t thick enough to fully cover the purple, which is opaque enough to cover anything. I’ll definitely be using the pink as the base color from now on. Photos were taken in both the studio and outdoors in direct sunlight.

IMG_13612

IMG_13722

ssrnafmsrnamm

Sweet Revenge, the French Mix series, and the double-ended brushes in general seem to be discontinued by Revlon, because I don’t see them on their website (good). Other Revlon products are available nationwide.

I bought this product myself.

Manicure Monday: Nail Art Ripper-Offer

For today’s Manicure Monday, I attempted some actual nail art! A couple of weeks ago, Reddit user chill_out_dont_pout did an adorable mani with geometric shapes and negative space, and I’m totally biting her style. For my copycat mani, I used OPI’s Metallic 4 Life and Essie’s Toggle to the Top for the stripes, Fantasy Makers’s Night Glow as the base, and Seche Vite as my top coat.

mmnaro

mmnaro2

It’s been a really long time since I’ve done anything this intricate and time-consuming. For the past several Manicure Mondays, I’ve just been laying glitter down on accent nails and calling it a day. Inspired by that Reddit post, I decided I would buckle down and do some real nail art. I had the time, and I wanted to use this glow-in-the-dark polish but had no ideas for it, so it was a perfect coincidence. It was so easy to make this pattern my own; I used two glitter jelly polishes I really loved, made one edge longer than the other (by accident) and added rhinestones to the vertices. In all, I probably spent three hours or more on this look.

mmnaro3

mmnaro4

Of course, I could have done a better job. My lines aren’t clean or even, and Night Glow was actually a big mess to work with; it was goopy and kind of dried out, so I put some thinner in. It wasn’t enough. I put in more. Even though it felt dry to the touch, I guess the under-layers never fully dried, because even though I waited an hour before I started taping, I still pulled up polish. Thankfully, thanks to a stealthy fourth coat of Night Glow and the power of Seche Vite, you can barely tell!

mmnaro5

Night Glow, as you might have guessed, glows in the dark. However, I am terrible at glow-in-the-dark nail photography, so here are some glow fails.

mmnaro7

mmnaro6

Thanks again to /u/chill_out_dont_pout for the nail inspiration!

Manicure Monday: Double Reverse Green on Green Gradient

So for this Manicure Monday, I did some actual nail art instead of phoning it in with glitter. I always feel a little weird when I do a glitterless mani, like my nails are still naked somehow. This week, I did a double reverse gradient with Julep’s Payton and Color Club’s Twiggie. Payton is shown on the non-accent nails with two coats. All nails have a coat of Seche Vite top coat and Hard Candy’s Matte-ly in Love. Photos were taken indoors and outdoors.

IMG_53202

IMG_53312

IMG_53242

So the colors I chose this week go well together, but were still somewhat incongruous. Payton is a gorgeous kelly green creme that went on sheer with the first coat; the second coat even it out, but it was still deliciously shiny, a finish I’d expect from a jelly. Twiggie was a much more solid creme, and was opaque on its first coat. Together, Twiggie is the foundation of the gradient, and I didn’t get the opacity I expected from Payton, and the resulting gradient left me a little underwhelmed. Payton was so sheer that it didn’t cover over Twiggie as well as I thought it would. I will say this, though: I hated putting the matte coat over Payton. It was so shiny and so beautiful on its own that I felt like I was sucking the life of it by mattifying it. I really felt like I did this polish a disservice.

IMG_53402

IMG_53442

If you’re wondering how to do the double reverse gradient, it’s way simpler than it looks. Here’s the tutorial:

1. After you lay down your base colors, do a gradient the same way you usually do. For what it’s worth, I like to use eyeshadow sponge applicators instead of makeup wedges; for me, it’s more precise and makes less of a mess.

2. After your first gradient is dry, put down your striping tape as desired.

3. Do your second gradient, reversing the colors from the first gradient.

4. Peel off the tape, apply your top coat, and you’re done!

IMG_53522

Outdoors, full sun

IMG_53552

This really looked better in my head. I expected a stronger difference between the colors, but the sheerness of Payton didn’t make that possible. I also feel like I’m missing something; maybe I should have done a coat of Fairy Dust or something under Payton, just to add a little extra sparkle. On the plus side, and this was completely unintentional, it reminds me of a soccer field. I have been so caught up in watching the World Cup matches that I’ve been unable to think of much else. Despite the issues I’ve had with the polish compatibility, I love how this turned out.

PS: I have Payton on my toes as well. I love it. It’s like every toe is cosplaying as the toe from The Big Lebowski.

Manicure Monday: Half Moons and Pearls on Nubbins

I broke a nail Sunday night. I was reaching for something, hit my pinky nail on it, and it just popped off. I couldn’t even save it. It broke completely off at the nail bed. I had to cut them all short. My nails haven’t been this short since I moved out of my apartment and broke every nail taking posters down. My fingertips touch the keyboard keys when I type and it’s weird.

100_2537

This is the nubbin version of the manicure I had planned for my long, beautiful nails. I almost didn’t do it, since I thought it would look strange on small nails. And it does, kind of. I think the design probably exaggerates how short the nails are, and I almost did give up on the pattern to do a solid black, but where would the fun have been in that? Even nubbin nails deserve to be pretty.

China Glaze's For Audrey, LA Colors' Black Pearl

China Glaze’s For Audrey, LA Colors’ Black Pearl

Nubbin nails are no fun, but they’ll grow back.

Manicure Monday: Orange and Nude Sparkly Starburst

I feel like orange is a color that doesn’t get enough play. I only have a few orange pieces of clothing, and I only have a few bottles of orange polish, even though I have hundreds of bottles of polish. I guess it’s unpopular because it’s so bright and attracts a lot of attention, but that’s exactly why I like it.

100_2413

This week, I made a starburst thing with orange polish over striping tape, nude, and holographic glitter. It was inspired by a stamp plate I have, with stripes fanning out over the nail. However, in all my test runs, I absolutely could not get the stamped design to cover my nail the way I wanted, so I tried it with the striping tape. I like this look, but I wish I’d used more pieces to make more lines, to make the color and glitter beneath slightly more noticeable.

Intentionally blurred to show off the glitter.

Intentionally blurred to show off the glitter.

I worked with some great colors with week. The nude is Naked, from Urban Decay’s (now very rare) Naked nail set. I hated neutral nail colors before I got this set. Naked is such a subtle but gorgeous shade that I felt a little bad that I was going to cover up most of it. I added the Fairy Dust glitter on impulse; I thought a soft sparkle would make the nude lines stand out more. The orange is an Insta-Dri color called Heat Flash, and it’s fantastic. I got great coverage in one quick drying coat.

Urban Decay's Naked, China Glaze's Fairy Dust, Sally Hansen's Heat Flash

Urban Decay’s Naked, China Glaze’s Fairy Dust, Sally Hansen’s Heat Flash

I love this mani, but there are a few things I’ll do differently next time. First, I want to strike a higher contrast between the colors. I really want the starburst pattern to stand out, so I’ll use black over white or light blue over dark blue. Next, I’ll use more tape and add more lines. Maybe I’ll add rhinestones to the vertices to give it something extra. For now though, I’m pleased.

Manicure Monday: Yellow Lattice on Grey

I ran out of Seche Vite this weekend trying to smooth down a heavy glitter manicure, and didn’t have enough of to finish this week’s mani. I had to resort to my backup, the el cheapo LA Colors top coat that takes ages to dry and can’t be applied until the lacquer itself is dry. When I woke up this morning, a couple of the nails on my right hand were dimpled and rough from being pressed into teddy bear fur, and I’d done them hours before I’d gone to bed. This stuff seriously takes until 2014 to dry.

100_2319

This was my first time using striping tape to make thin, clean lines. Some of the nails came out really well. On some of them, I forgot the order in which I put down the tape pieces and smudged a few of the lines. The dots, thankfully, cover most of those. On the whole, it’s kind of a mess: there are more stripes on some nails than on others; none of them are consistent. That, and with the top coat problem, I’m kind of just counting the days until I take them off.

Julep's Lexie, Orly's Decoded, Sally Hansen's Hard to Get (again)

Julep’s Lexie, Orly’s Decoded, Sally Hansen’s Hard to Get (again)

Here are the colors I used this week. Lexie was a little hard to work with; even after two coats, I still had steaks and bald spots in places. Decoded is one of my favorites, though. It’s pretty much opaque in one coat, dark and mysterious. I’ll be sad when this one is empty.