Manicure Monday: Jazzy Mint Glitter Gradient

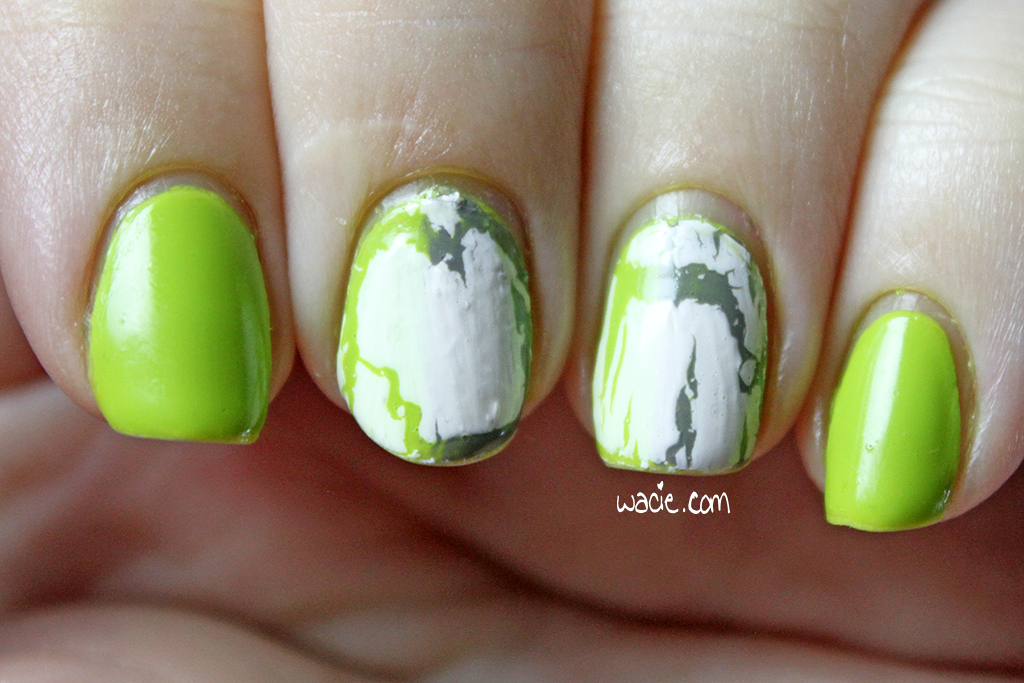
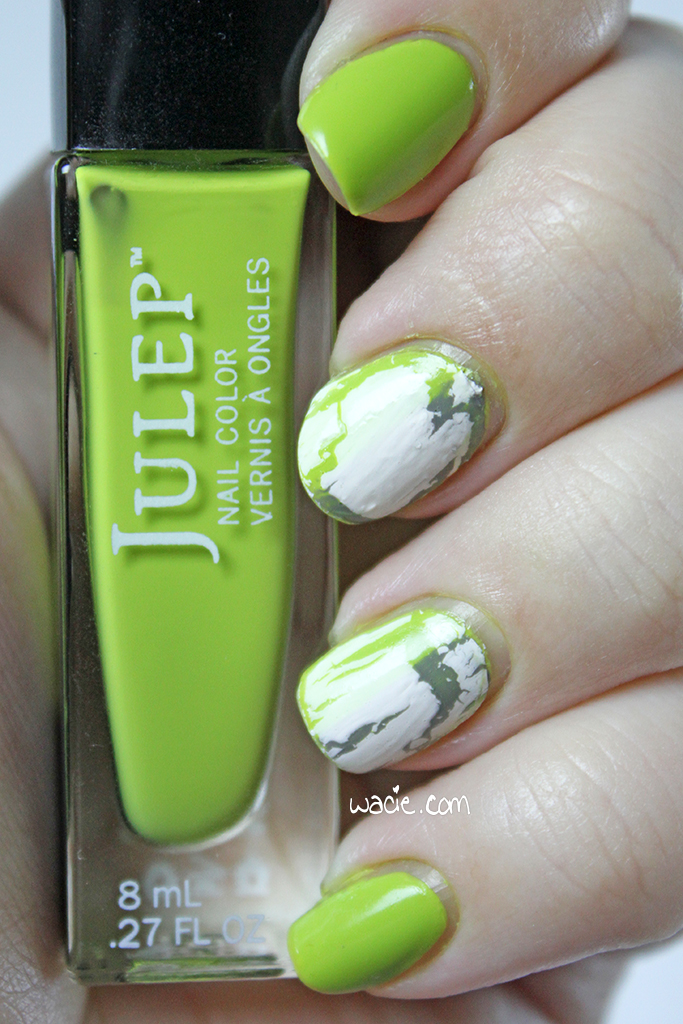
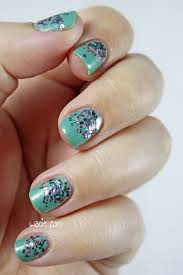
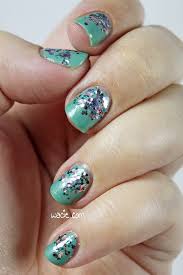
Happy Monday, reader! Hope you had a good one. I present to you this weekend’s edition of Manicure Monday; I tried my hand at a glitter gradient for the first time in ages, and I’m pretty happy with the result. My base color is Sinful Colors’s Mint Apple, and my glitter is Essie’s Jazzy Jubilant. I also used one coat of Seche Vite top coat.

mmjmgg

mmjmgg2

A quick few words about the polishes I used: Mint Apple is a minty green with some silvery shimmer. It’s a very nice polish; I like the color and shimmer together, and I feel like it’s a unique piece in my collection, despite being so simple. Jazzy Jubilant is like the grown-up version of the classic rainbow glitter; the colors are muted and deeper, but each color is respresented well. I actually didn’t like it much when I first got it, but wearing it has totally changed my mind. It looks way better on the nail than in the bottle, especially over a base color like this one.

mmjmgg3

mmjmgg4

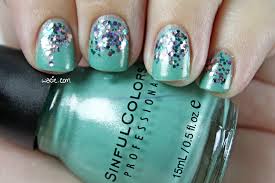
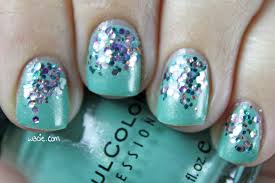
I tried the gradient from the cuticle for the first time, and I like it. I just wish I had more nail real estate. I only wanted a smattering of glitter instead of the dense coverage I got. I applied the glitter with an eyeshadow applicator sponge, and while the sponge absorbed the excess lacquer, the dryness meant I couldn’t push the glitter around like I wanted to, and of course once there’s too much, I can’t take it off, so I got stuck with it. It’s not bad, and if my nails were longer, there would have been more room to fade out the gradient, so to speak, but I’m pretty happy with it as is.

mmjmgg5

mmjmgg6

Mint Apple and other Sinful Colors products are sold in stores nationwide, as are Jazzy Jubilant and other Essie shades. I got mine from Walgreens.

I bought these polishes myself.

Manicure Monday: Red Luxe

Welcome to Manicure Monday! I think you’ll be pleasantly surprised to see that I got off my duff, got the dotting tool out, and did some real nail art. I still kind of suck with the dotting tool, but I’m really pleased with my results. For this look, I used Maybelline’s Red Relic as my primary color, Ciaté’s Gold Digga as the secondary color, and caviar beads in Gleam, also from Ciaté. I also used Seche Vite and Hard Candy’s Just Matte top coat.

mmrl

mmrl2

Red Relic is a fun little polish. It’s a red jelly with iridescent pink flakies that dries matte. I was a little disappointed when I first tried it out, because I’m not a huge fan of the matte finish. I supposed then that it wasn’t anything top coat couldn’t fix, so I kept it. The finish has grown on me, though. It’s actually the reason I made the whole manicure matte. Gold Digga has a metallic shine, and I needed to even it out with a matte top coat, so the finish you’re seeing is actually the matte coat, not the original Red Relic finish.

mmrl3

mmrl4

Gold Digga and the Gleam beads came together in a caviar nails set that was in the sale bin at Sephora. Gold Digga is a pretty nice polish; it’s a burnished gold with a rich metallic finish. It also looks fantastic mattified. The matte coat hides the brush strokes and evens out the color. It’s rare that I think a polish looks better without a glossy finish, but this one definitely does. I feel like it helps emphasize the luxe feel Ciaté was going for.

mmrl5

The two colors together are gorgeous. I got the elegant and opulent look I wanted. I’m just a bit unhappy with all the nail art horrors my camera captured. In the photos you can see just how uneven the crosses are, you can see all the gaps in the caviar, you can see the glue spots where I put the studs down. I know nobody probably noticed them until I mentioned them, but when I look at these photos, they’re all I see. In person, though, this mani is perfect.

Red Relic was a limited edition and has been discontinued by Maybelline, though you can find it if you look around the internet. Gold Digga and the caviar nail kit are available from Ciaté’s website. Hard Candy’s matte coat is from Walmart. My studs are from an outlet store.

I bought all of these products myself.

Manicure Monday: Nail Art Ripper-Offer

For today’s Manicure Monday, I attempted some actual nail art! A couple of weeks ago, Reddit user chill_out_dont_pout did an adorable mani with geometric shapes and negative space, and I’m totally biting her style. For my copycat mani, I used OPI’s Metallic 4 Life and Essie’s Toggle to the Top for the stripes, Fantasy Makers’s Night Glow as the base, and Seche Vite as my top coat.

mmnaro

mmnaro2

It’s been a really long time since I’ve done anything this intricate and time-consuming. For the past several Manicure Mondays, I’ve just been laying glitter down on accent nails and calling it a day. Inspired by that Reddit post, I decided I would buckle down and do some real nail art. I had the time, and I wanted to use this glow-in-the-dark polish but had no ideas for it, so it was a perfect coincidence. It was so easy to make this pattern my own; I used two glitter jelly polishes I really loved, made one edge longer than the other (by accident) and added rhinestones to the vertices. In all, I probably spent three hours or more on this look.

mmnaro3

mmnaro4

Of course, I could have done a better job. My lines aren’t clean or even, and Night Glow was actually a big mess to work with; it was goopy and kind of dried out, so I put some thinner in. It wasn’t enough. I put in more. Even though it felt dry to the touch, I guess the under-layers never fully dried, because even though I waited an hour before I started taping, I still pulled up polish. Thankfully, thanks to a stealthy fourth coat of Night Glow and the power of Seche Vite, you can barely tell!

mmnaro5

Night Glow, as you might have guessed, glows in the dark. However, I am terrible at glow-in-the-dark nail photography, so here are some glow fails.

mmnaro7

mmnaro6

Thanks again to /u/chill_out_dont_pout for the nail inspiration!

Manicure Monday: Bedspiration

It’s Monday again, and you know what that means! My nails this Manicure Monday were inspired by the bedding set in one of my guest rooms. I’m wearing Julep’s Korin and China Glaze’s Recycle with OPI’s White Shatter, all with one coat of Rica‘s Glossy Glam top coat.

IMG_83972

IMG_84062

I know lots of you look at something and can automatically translate it to nail art. It’s impressive and I’m totally envious. I’m not as big into intricate nail art as I used to be (even when I was, I was awful at it), so it’s rare that I look at something and think “Yes, I want my nails to look like this”. It’s even rarer that I act on it. When I saw this comforter, even before I realized it, I knew I could do a quick-and-dirty nail art version. Green polish, gray polish, and white crackle. It could be done. When I grabbed Korin out of the storage container, I knew I had to try it out.

IMG_84102

IMG_84122

Unfortunately, I think it looked better in my head. Crackle polish is unpredictable sometimes, and though that’s the one thing I love about crackle polish, I really didn’t think it would cover up most of my nail. It defeats the purpose of the whole thing. I was hoping for a jagged but even grid of crackle, leaving the colors beneath somewhat visible. Oh, well. I still like it, even if it’s not what I was going for at all.

IMG_84202

IMG_84262

IMG_84362

I got Korin from julep.com, Recycle from Sally Beauty Supply, and White Shatter from Publix. If you’re curious, the bedding is from Target.

I bought these polishes myself.

Manicure Monday: Sparkle and Caviar

My Manicure Monday today is kind of an experiment. The polish I have on is one I love, Revlon’s Sparkle Aplenty. I needed an accent piece, so I tried caviar nails for the first time. I’m wearing three coats of Sparkle Aplenty with one coat of Ciate’s Speed Coat Pro, and my caviar mix is Ciate’s Midnight in Manhattan.

IMG_17552

IMG_17662

IMG_17742

Sparkle Aplenty is a black crelly with lots of metallic silver glitters in various sizes. It went on pretty easily; the first coat was thin and streaky, but the second one evened it out nicely. Full opacity was reached at two coats. The glitters spread well and evenly. This polish dries quickly and with a satin/semi-glossy finish. Because glitter is the bulk of the polish, there’s lots of glitter texture after drying; a top coat would definitely be necessary with this.

IMG_17842

IMG_17882

I thought the Midnight in Manhattan would be the perfect caviar mix, because they contain the same colors. The caviar beads are actually a bit more colorful; in my office, it just looks like silver and black beads. In the studio, I find out that they’re gold, as well as some greens, blues, and purples that I failed to notice before. Also, for some strange reason, the corners of my caviar nail appear to flare out instead of curling under, like the rest of my nails do. It looks weird when all my nails appear slender and tapered, and then one looks like a duck foot. It bothers me. It’s wrong.

IMG_17912

IMG_17992

I do admit I liked this mani a lot better before I added the caviar. I should have just used studs again. I don’t hate caviar nails (yet), but I have a ton of bead jars (thanks, Ciate advent calendars), and I wanted to use one, just to see what the two-year-old fuss was about. Perhaps I’ll like them more in the future. Today, I don’t. Today, I just see fail.

2014 Birthday Nails!

It’s my birthday! I’m not going to do a proper write-up of all the polishes today, I’m just going to show this off because I am way too proud of it.

IMG_02002

Here are the polishes I used:
Thumb: Blue-Eyed Girl Lacquer‘s Dawn Breaks
Index: Indigo Banana‘s Moonlight (Clair de Lune)
Cupcakes: P2’s French Kiss, American Apparel’s Neon Pink, Essie’s Fiji, Ciate’s Candy Floss
Pinky: Blue-Eyed Girl Lacquer’s If You’re a Seascape

I also want to take a moment to thank everyone who’s participating in the giveaway! If you haven’t entered yet, you have, of this writing, eight hours left to enter to win two Ciate polishes. The winner will be announced tomorrow! I’m so excited, this is my first giveaway and it is going gloriously well. I can’t wait to do this again.

Summer of Untrieds Day 27: Matte

We’re nearing the end of the Summer of Untrieds! Today’s theme is matte, so I went with Ciate’s Chalkboard Paint from the Chalkboard Manicure set. I’m wearing three coats of it with no top coat.

IMG_74322

IMG_74372

Chalkboard Paint is a matte black creme. I had some issues applying it; in some places, it cracked, showing my bare nail underneath, like a crackle polish. Check out my thumb nail, that’s where it’s the most apparent. It’s also unforgiving; I tried to cover the cracks, but they just show through the second coat. However, it does dry very matte. It has no shine whatsoever, so it has that going for it, which is nice.

IMG_74472

IMG_74562

IMG_74622

IMG_74692

The Chalkboard Manicure set also come with four chalk pens for nail art, so I got them out and doodled out a rough vintage roses design. Really rough.

IMG_74792